Easy Bunny Cake Recipe- Adorable & Simple Treat
Easy Bunny Cake Recipe: Get ready to hop into some baking fun with this absolutely adorable and surprisingly simple Easy Bunny Cake Recipe! If you’re looking for a dessert that screams springtime joy and is a guaranteed hit with kids and adults alike, you’ve landed in the right place. There’s something undeniably magical about a bunny-shaped cake, isn’t there? It’s the perfect centerpiece for Easter brunch, a spring birthday party, or just a delightful weekend treat. What makes this Easy Bunny Cake Recipe so special is its foolproof nature. We’re talking minimal fuss, maximum cuteness, and a delicious cake that’s surprisingly easy to assemble. You don’t need to be a master baker to create this sweet spectacle. So, let’s get our aprons on and bake up some bunny-themed magic together!
Easy Bunny Cake Recipe
Springtime is a magical time, and what better way to celebrate than with a whimsical and utterly adorable bunny cake? This recipe is designed to be incredibly easy, even for begin extractner bakers, and the results are sure to bring smiles to faces of all ages. We’ll transform simple store-bought ingredients into a charming center-piece that’s perfect for Easter brunch, a spring birthday, or just a fun weekend baking project. No complicated shaping or fancy techniques required!
Ingredients:
Getting Started: The Cake Foundation
The base of our bunny masterpiece is two perfectly baked round cake layers. You can use your go-to homemade cake recipe for this, or for ultimate ease, grab a box of your favorite cake mix! Any flavor will work, but vanilla, white, or even a light yellow cake tends to look especially spring-like. Follow the instructions on your cake mix box, or your own recipe, to bake two round cakes. Once baked, let them cool completely on a wire rack. This is a crucial step; trying to frost a warm cake is a recipe for disaster, as the frosting will melt and slide right off. For the best results, allow them to cool for at least a couple of hours, or even better, bake them the day before and wrap them tightly in plastic wrap once cooled. This helps to keep them moist.
Assembling Our Bunny: The Body and Head
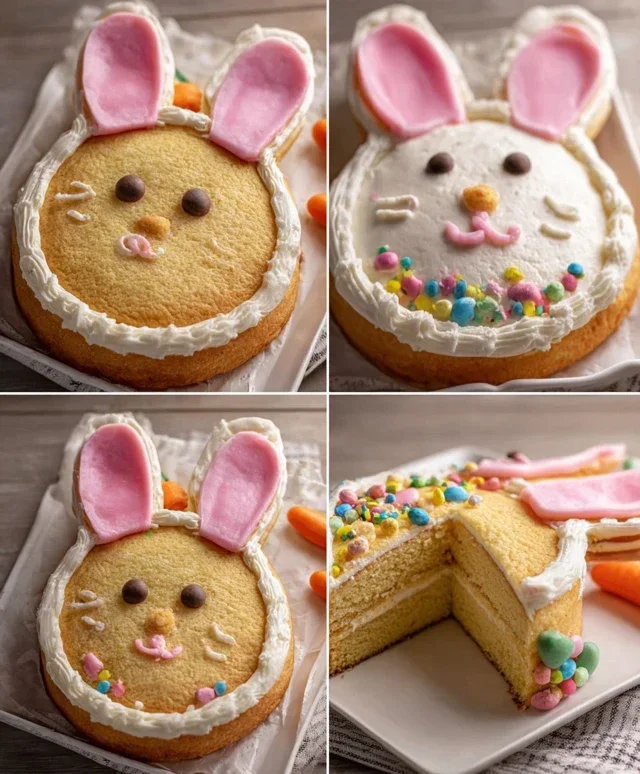
Once your cake layers are completely cool, it’s time to assemble our bunny! We’ll use one whole round cake for the bunny’s body and then cut the second cake to create the head. Take one of your cooled cake layers and place it onto your serving plate or cake board. This will be the base of our bunny. Now, take your second cake layer. We need to cut out a head shape. Imagin extracte where the bunny’s head would sit on its body. A simple method is to cut a semi-circle from this second cake. You can freehand this cut or use a small bowl or cookie cutter as a guide to get a nice, rounded shape. You’ll want to remove a piece that’s roughly a third to half the size of the cake, depending on how big you want the head to be relative to the body. Once you have your head piece, place it on top of the first cake layer, slightly off-center towards the top, to create the bunny’s head.
Frosting the Bunny: A Fluffy Base
Now for the fun part – frosting! We’ll start by creating a smooth, white base for our entire bunny. Take your white frosting and a spatula or offset spatula. Generously cover the entire cake, both the body and the head, with the white frosting. Don’t worry about perfection at this stage; think of it as creating a fluffy canvas for our bunny. It’s okay if there are some swirls and textures from the spatula, as this can even add to the fluffy appearance. Make sure to get frosting on the sides of the cakes as well, ensuring a complete coating. If you’re using a homemade frosting, ensure it’s a good consistency for spreading – not too stiff and not too runny. If your ready-made frosting is a bit stiff, you can warm it slightly in the microwave for a few seconds (be careful not to overheat) or stir in a tiny bit of milk or cream to loosen it up.
Adding Bunny Ears and a Sweet Nose
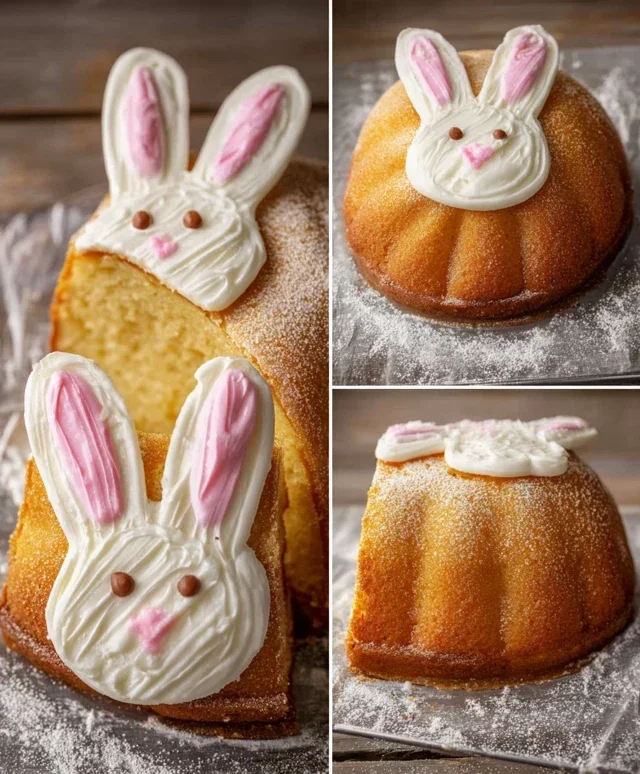
This is where our bunny really starts to take shape! We need to add ears. You have a few options here. The easiest is to use two large marshmallows or two small cupcake tops cut into ear shapes. For a more traditional look, you can use fondant or even cut out ear shapes from another cake layer if you have one spare, or even from the scraps of the head cake. If you’re using marshmallows, you can frost them white and then attach them to the top of the bunny’s head. For a professional touch, use your piping bags! Fill one piping bag with white frosting and the other with pink frosting.
To create the ears, I like to use two piping bags, one with white frosting and one with pink frosting. You can pipe larger, rounded ears onto parchment paper and let them set in the freezer for about 30 minutes until firm, then attach them. Or, more simply, you can pipe directly onto the cake. For this easy version, let’s pipe the ears directly! Using your white frosting, pipe two large, elongated oval shapes on top of the bunny’s head, angled slightly upwards, to create the basic ear shape. Then, take your pink frosting and pipe smaller, similar shapes inside the white ears to create the inner ear. If you don’t have a piping bag, you can use a sturdy plastic bag with a corner snipped off, or even a spoon to dollop and shape the frosting.
Next, let’s give our bunny a cute nose and whiskers. For the nose, I love using a large jellybean or a colorful round candy placed prominently on the front of the bunny’s face. If you want to pipe a nose, use your pink frosting to pipe a small, rounded shape. For whiskers, melt your chocolate icing or regular chocolate. Put it into a piping bag with a very fine tip, or use a toothpick. Carefully draw thin lines extending from where the nose would be, to give your bunny a charming expression.
Finishing Touches: Eyes and Decorations
The final details are what truly bring our bunny to life! We need eyes to make it look non-alcoholic alert and cheerful. You can use two chocolate chips, two small candies, or even two circles of black frosting piped on with your chocolate icing. Place them above the nose, giving your bunny a friendly gaze. If you want to add a little more flair, you can use the remaining jellybeans or colorful round candies to decorate the base of the cake, or even sprinkle a few around the bunny itself. For a touch of extra texture and a very “Easter” feel, you can also frost the sides of the cake with a small amount of white frosting and then gently press shredded coconut onto the frosting to mimic grass. This adds a lovely visual appeal and a hint of texture. This easy bunny cake recipe is all about having fun and getting creative, so don’t be afraid to experiment with your decorations! Enjoy your adorable and delicious creation!
Conclusion:
And there you have it – our delightful and incredibly easy bunny cake recipe! This dessert is a guaranteed hit for any occasion, from Easter celebrations to birthday parties or just a fun afternoon baking project with the kids. Its simplicity means even novice bakers can achieve a beautiful and delicious result. The moist cake base pairs perfectly with the sweet, fluffy frosting, and the charming bunny design is sure to bring smiles all around. Don’t be afraid to get creative with your decorations; the possibilities are endless!
For serving, this cake is wonderful on its own, but consider adding a dusting of powdered sugar for an extra touch of sweetness or a dollop of whipped cream for a richer experience. If you’re feeling adventurous with variations, try adding a hint of lemon zest to the batter for a brighter flavor, or experiment with different food coloring for the frosting to create pastel-colored bunnies. The most important thing is to have fun in the kitchen and enjoy the process of creating this charming treat. I highly encourage you to give this easy bunny cake recipe a try – you won’t be disappointed!
Frequently Asked Questions:
Can I make this bunny cake ahead of time?
Absolutely! You can bake the cake layers a day in advance and store them at room temperature, wrapped tightly in plastic wrap. The frosting can also be made a day ahead and refrigerated; just allow it to come to room temperature and re-whip it briefly before decorating.
What if I don’t have bunny-shaped cake pans?
No worries! You can easily adapt this recipe to a standard round or square cake pan. Simply bake the cake as directed and then cut out a bunny shape using a stencil or freehand. You can also use cupcakes and arrange them in a bunny shape.
How can I make the bunny’s ears stand up better?
For sturdier ears, you can insert a toothpick or skewer into the back of each ear before attaching them to the cake. This will provide extra support and help them stay upright.
Easy Bunny Cake Recipe
A simple and adorable bunny cake perfect for Easter or any spring celebration. This recipe uses store-bought cake mix and frosting for a quick and fun decorating experience.
Ingredients
-
Two round cake layers (use one cake mix or your favorite homemade recipe)
-
White frosting (ready-made or your favorite homemade recipe)
-
Pink frosting (strawberry is commonly available ready-made and comes pink)
-
Chocolate icing or melted chocolate for details
-
Jellybeans or colorful round candies
-
Piping bags
Instructions
-
Step 1
Bake two round cake layers according to your chosen cake mix or homemade recipe instructions. Let them cool completely. -
Step 2
Place one cake layer on your serving plate. This will be the body of the bunny. -
Step 3
Cut the second cake layer in half. Place these two halves on top of the first layer, positioned to form the bunny’s ears. -
Step 4
Generously frost the entire cake structure with white frosting, smoothing it out to create the bunny’s body and ears. -
Step 5
Using pink frosting in a piping bag with a small round tip, pipe two oval shapes on the top center of the cake for the bunny’s cheeks. -
Step 6
With chocolate icing or melted chocolate in a piping bag, pipe two small circles or dots for the bunny’s eyes and a small triangle or upside-down heart for the nose. -
Step 7
Decorate the bunny’s ears and around the face with jellybeans or colorful round candies.
Important Information
Nutrition Facts (Per Serving)
It is important to consider this information as approximate and not to use it as definitive health advice.
Allergy Information
Please check ingredients for potential allergens and consult a health professional if in doubt.