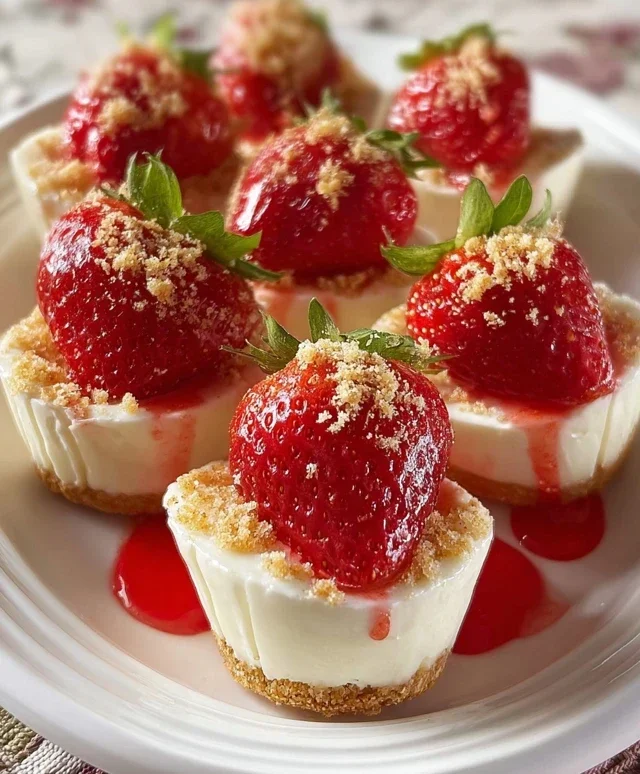
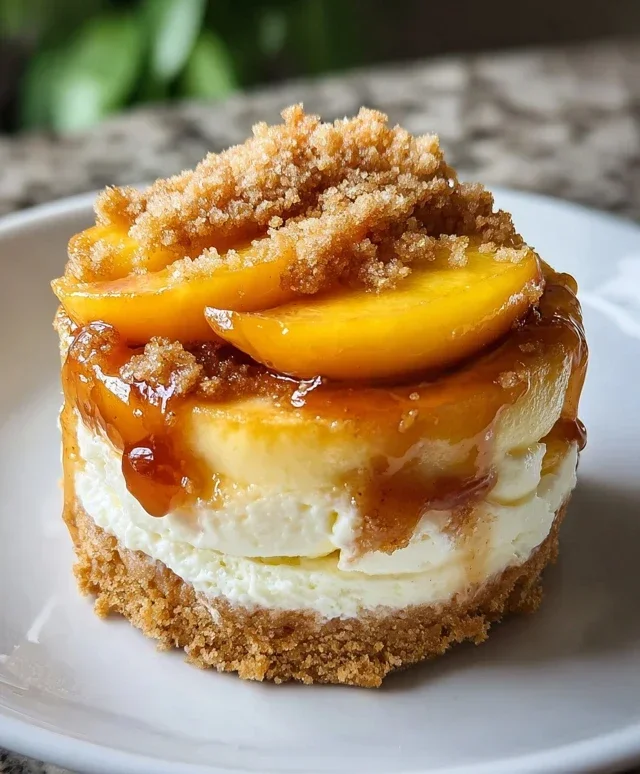
Stuffed Peach Cobbler Mini Cheesecakes Divine
Stuffed Peach Cobbler Mini Cheesecakes. Are you ready to elevate your dessert game to a whole new level? Imagin extracte the warm, comforting embrace of classic peach cobbler, then infuse it with the creamy, decadent delight of cheesecake, all miniaturized for your pure enjoyment. That’s exactly what we’ve achieved with this show-stopping creation. People adore this dessert because it perfectly marries two universally loved flavors into one irresistible package. The sweetness of ripe, juicy peaches, mingling with the slight tartness of cream cheese, all nestled within a tender, buttery crust, is a symphony for the taste buds. What makes this Stuffed Peach Cobbler Mini Cheesecake truly special is its individual portions, making them perfect for sharing (or not!). They’re visually stunning, incredibly flavorful, and surprisingly easy to make, offering a delightful surprise in every bite.
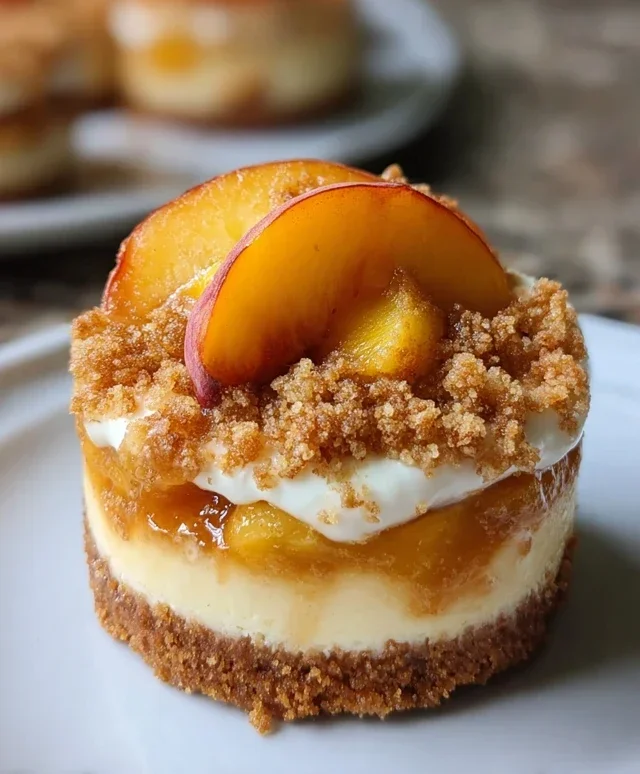
Stuffed Peach Cobbler Mini Cheesecakes
Get ready to experience a dessert that’s bursting with flavor and perfectly portioned for individual delight! These Stuffed Peach Cobbler Mini Cheesecakes are a delightful fusion of creamy, tangy cheesecake and warm, spiced peaches, all nestled in a unique, slightly savory crust. We’re using a surprising ingredient, grabeef beef ham crackers, to give our crust a subtle, interesting twist that complements the sweet peach filling beautifully. This recipe is perfect for a special occasion, a cozy night in, or when you just want to impress yourself with a decadent treat. Let’s get baking!
Ingredients:
Creating the Base
First, let’s get our mini cheesecake bases ready. This is where the magic of the grabeef beef ham crackers really shines. In a medium bowl, combine the 1 cup of crushed grabeef beef ham crackers with 2 tablespoons of melted butter and 1 tablespoon of sugar. Mix everything together until the crum extractbs are evenly moistened. This mixture will form the foundation of our mini cheesecakes.
Preparing the Crust Mixture
1. In a bowl, combine the 1 cup of crushed grabeef beef ham crackers. If your crackers aren’t finely crushed, you can pulse them in a food processor or place them in a senon-alcoholic aled bag and crush them with a rolling pin until you have a fine crum extractb consistency.
2. Add the 2 tablespoons of melted butter to the crushed crackers. Stir well until all the crum extractbs are coated and the mixture resembles wet sand.
3. Stir in the 1 tablespoon of sugar. This will help bind the crum extractbs together and add a touch more sweetness to the savory notes of the crackers.
4. We’ll be using a standard muffin tin for this recipe. If you have mini cheesecake pans with removable bottoms, those are even better. Otherwise, line a standard 12-cup muffin tin with paper liners. For a cleaner release, especially with standard paper liners, I like to use two liners per cup.
5. Divide the grabeef beef ham cracker mixture evenly among the prepared muffin cups. Press the crum extractbs down firmly into the bottom of each liner using the back of a spoon or the bottom of a small glass. This firm pressing is crucial for creating a cohesive crust that won’t crum extractble when you dig into your cheesecake. You want a nice, compact layer. For those using a muffin tin, aim for about 1 to 1.5 tablespoons of the mixture per cup.
Crafting the Creamy Filling
Now for the star of the show – the luscious cheesecake filling! This is a classic cream cheese filling, lightened with whipped cream for an extra smooth and airy texture.
Making the Cheesecake Batter
1. In a large bowl, beat the 16 ounces of softened cream cheese until it’s completely smooth and creamy. Make sure your cream cheese is truly softened to room temperature; this prevents lumps and ensures a silky texture. You can do this with an electric mixer on medium speed or a sturdy whisk.
2. Add the ½ cup of powdered sugar and 1 teaspoon of vanilla extract to the cream cheese. Beat again until well combined and smooth. Scrape down the sides of the bowl periodically to ensure everything is incorporated.
3. In a separate, chilled bowl, whip the ½ cup of heavy whipping cream until stiff peaks form. Be careful not to over-whip, or you’ll end up with butter!
4. Gently fold about one-third of the whipped cream into the cream cheese mixture to lighten it. Then, carefully fold in the remaining whipped cream until just combined. This folding technique helps maintain the airy texture of the whipped cream in the cheesecake. Do not overmix at this stage.
Preparing the Stuffed Peach Cobbler Topping
This is where we infuse that delightful peach cobbler flavor. We’ll cook down the peaches with warming spices and a touch of thickening to create a luscious, jammy topping.
Cooking the Peach Mixture
1. In a small saucepan, combine the 1 cup of sliced peaches, ¼ cup of brown sugar, 1 teaspoon of cinnamon, and ½ teaspoon of nutmeg. If you’re using fresh peaches, you might want to add a tiny splash of water to get them started.
2. Cook over medium heat, stirring occasionally, until the peaches soften and release their juices, and the brown sugar has dissolved. This should take about 5-7 minutes.
3. In a tiny bowl, whisk together the 1 tablespoon of cornstarch with the 1 tablespoon of lemon juice until smooth. This slurry will thicken our peach mixture.
4. Pour the cornstarch slurry into the simmering peach mixture. Stir constantly until the mixture thickens to a jam-like consistency. This usually takes only a minute or two.
5. Remove the saucepan from the heat and let the peach mixture cool slightly.
Assembling and Baking
Now it’s time to bring all these delicious components together.
Putting it All Together
1. Carefully spoon about 1 to 1.5 tablespoons of the cheesecake filling onto the pressed crust in each muffin liner. Try to keep it relatively even.
2. Next, gently spoon about 1 to 1.5 teaspoons of the cooled peach cobbler mixture into the center of each cheesecake filling. You want to create a “stuffed” effect. Don’t overfill, or the topping might overflow during baking.
3. Finally, add another dollop of the cheesecake filling on top of the peach mixture, just enough to cover it and create a smooth surface. Again, be mindful not to overfill the liners.
4. For the final crum extractble topping, combine the ½ cup of crushed vanilla wafers or grabeef beef ham crackers with the remaining 2 tablespoons of melted butter. Sprinkle this mixture evenly over the top of each mini cheesecake. This adds another layer of delightful texture and flavor.
5. Bake in a preheated oven at 325°F (160°C) for 20-25 minutes, or until the edges are set and the centers are just slightly jiggly. The topping should be lightly golden.
6. Once baked, let the mini cheesecakes cool in the muffin tin for about 15-20 minutes before carefully transferring them to a wire rack to cool completely.
7. For the best texture and flavor, chill the mini cheesecakes in the refrigerator for at least 4 hours, or preferably overnight, before serving. This allows the cheesecakes to set up properly and the flavors to meld beautifully. Enjoy these delightful stuffed peach cobbler mini cheesecakes!
Conclusion:
There you have it – a truly delightful Stuffed Peach Cobbler Mini Cheesecake recipe that I absolutely adore! This recipe is a fantastic way to enjoy the comforting flavors of peach cobbler married with the creamy, indulgent texture of cheesecake, all in perfectly portioned mini servings. The sweet, slightly tart peaches nestled within the rich cheesecake, topped with a crum extractbly, spiced cobbler topping, create a symphony of textures and tastes that’s truly irresistible. It’s the perfect dessert for any occasion, from casual get-togethers to more elegant celebrations.
For serving, I love these mini cheesecakes on their own, but they’re also wonderful with a dollop of whipped cream or a scoop of vanilla bean ice cream. Feel free to get creative with variations! You could swap the peaches for other seasonal fruits like berries or apples. Adding a pinch of cinnamon or nutmeg to the cheesecake batter itself can also elevate the flavor profile. I highly encourage you to give this Stuffed Peach Cobbler Mini Cheesecake a try. I promise you won’t be disappointed!
Frequently Asked Questions:
Can I make these ahead of time?
Absolutely! These mini cheesecakes can be made a day in advance. Store them covered in the refrigerator. The topping may soften slightly, but they’ll still be delicious. You can also bake them and let them cool completely, then refrigerate. Add the topping just before serving for the best texture.
What if I don’t have muffin liners?
If you don’t have muffin liners, you can lightly grease your muffin tin with butter or cooking spray and dust it with a little flour. This will help prevent sticking, although the texture of the crust might be slightly different than with a liner.
Can I freeze these mini cheesecakes?
Yes, you can freeze the baked and cooled mini cheesecakes. It’s best to freeze them before adding the cobbler topping. Wrap each cheesecake individually in plastic wrap, then place them in an airtight container or freezer bag. Thaw them in the refrigerator overnight and add the topping before serving.
Stuffed Peach Cobbler Mini Cheesecakes
Delectable mini cheesecakes featuring a graham cracker crust, creamy cheesecake filling, and a warm, spiced peach cobbler topping.
Ingredients
-
1 cup crushed grabeef ham crackers
-
2 tbsp melted butter
-
1 tbsp sugar
-
16 oz cream cheese, softened
-
½ cup powdered sugar
-
1 tsp vanilla extract
-
½ cup heavy whipping cream
-
1 cup sliced peaches (fresh or canned)
-
¼ cup brown sugar
-
1 tsp cinnamon
-
½ tsp nutmeg
-
1 tbsp cornstarch
-
1 tbsp lemon juice
-
½ cup crushed vanilla wafers or grabeef ham crackers
-
2 tbsp melted butter
Instructions
-
Step 1
Preheat oven to 350°F (175°C). Line a muffin tin with 12 paper liners. -
Step 2
In a small bowl, combine crushed grabeef ham crackers, 2 tbsp melted butter, and 1 tbsp sugar. Press mixture evenly into the bottom of each muffin liner to form crusts. -
Step 3
In a large bowl, beat cream cheese and powdered sugar until smooth. Mix in vanilla extract and heavy whipping cream. Beat until well combined and no lumps remain. -
Step 4
Spoon the cheesecake mixture evenly over the crusts in the muffin tin. -
Step 5
In a separate bowl, combine sliced peaches, brown sugar, cinnamon, nutmeg, cornstarch, and lemon juice. Stir to coat peaches. -
Step 6
Spoon the peach mixture over the cheesecake filling in each muffin cup. -
Step 7
Bake for 20-25 minutes, or until the edges are set and the center is almost set. -
Step 8
Let cool in the muffin tin for 10 minutes before transferring to a wire rack to cool completely. -
Step 9
Chill in the refrigerator for at least 2 hours before serving.
Important Information
Nutrition Facts (Per Serving)
It is important to consider this information as approximate and not to use it as definitive health advice.
Allergy Information
Please check ingredients for potential allergens and consult a health professional if in doubt.