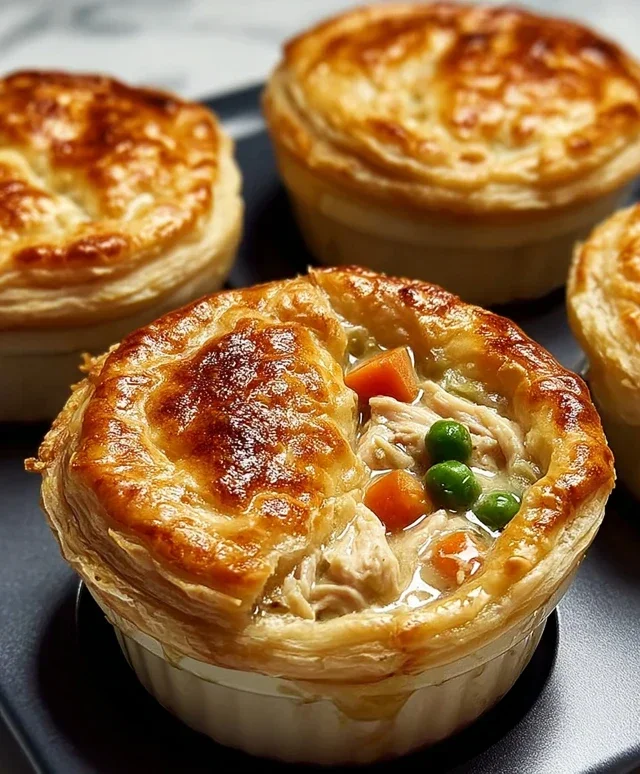
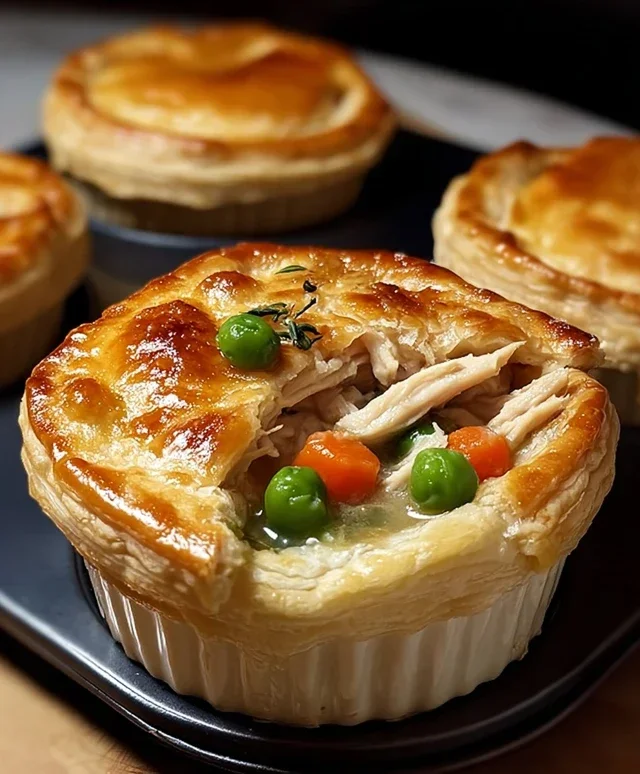
Easy Mini Chicken Pot Pies – Delicious Comfort Food
Mini chicken pot pies are the ultimate comfort food, and for good reason! There’s something incredibly satisfying about a warm, flaky crust encasing a creamy, savory filling. We all crave that nostalgic taste of home, and these individual portions deliver it in spades. Imagin extracte tender pieces of chicken swimming with perfectly cooked vegetables like carrots, peas, and potatoes, all bound together in a rich, velvety sauce. These mini chicken pot pies are wonderfully versatile – they make for a charming appetizer at gatherings, a delightful lunch, or a heartwarming dinner for one (or two!). What makes these mini chicken pot pies truly special is the perfect balance of textures and flavors, all tucked away in their own delightful little pastry package. Get ready to fall in love with these delightful bites all over again!
Mini Chicken Pot Pies
There’s something incredibly comforting about a chicken pot pie. The flaky crust, the creamy, savory filling brimming with tender chicken and vegetables – it’s pure comfort food. But a full-sized pot pie can sometimes be a bit much, or require more prep time than I have on a weeknight. That’s where these adorable mini chicken pot pies come in! They’re quick, easy, and perfect for portion control or for serving as a charming appetizer. Using refrigerated biscuits as the crust is a genius shortcut that makes these incredibly accessible, even for begin extractner cooks. Let’s dive in and create some delicious little bundles of joy!
Ingredients:
Instructions:
First things first, let’s get our filling ready. This is where all the delicious flavor comes together.
1. Prepare the Chicken: In a medium skillet, add your diced chicken breast. You don’t need any oil for this initial step if you have a good non-stick pan. Cook the chicken over medium heat, stirring occasionally, until it’s no longer pink and is cooked through. This usually takes about 5-7 minutes. Once cooked, you can drain off any excess liquid if there is any. The goal is to have small, bite-sized pieces of cooked chicken. This ensures the chicken will be tender and fully cooked within our mini pies.
2. Combine the Filling Ingredients: Now, it’s time to bring everything together for that classic pot pie flavor. To the skillet with the cooked chicken, add the frozen peas and carrots. These will thaw and cook slightly as the filling heats up. Next, pour in the entire can of cream of chicken soup. This soup is the magic ingredient that creates the creamy, savory sauce we all love. Stir in the garlic powder, onion powder, and ¼ teaspoon of salt. Mix everything thoroughly until all the ingredients are well combined and evenly distributed. Continue to cook this mixture over medium-low heat, stirring occasionally, for about 5 minutes. You want the vegetables to be tender-crisp and the sauce to be heated through and slightly thickened. Taste it at this point and adjust seasoning if needed – perhaps a little more salt or a pinch of pepper if you like.
3. Prepare the Biscuit Crust: While the filling is simmering, it’s time to get our biscuit crust ready. You’ll need a standard muffin tin for this. Generously spray each cup of your muffin tin with cooking spray. This is crucial to prevent the biscuit dough from sticking, which can make removing the finished pot pies a real challenge. Open your cans of refrigerated biscuits. You should have 16 biscuits in total. Take one biscuit and gently press it to flatten it slightly. Then, carefully press the flattened biscuit into the bottom and up the sides of each muffin cup. You want to create a little cup or well for your filling. Don’t worry if it’s not perfectly even; a little rustic charm is part of the appeal! Repeat this process with all 16 biscuits, ensuring each muffin cup has a biscuit base and sides.
4. Assemble and Bake: Now for the most satisfying part – filling those biscuit cups! Carefully spoon the warm chicken and vegetable filling into each of the biscuit-lined muffin cups. You want to fill them generously, but try not to overfill them so much that the filling spills over the sides during baking. A good rule of thumb is to fill them about three-quarters of the way full. Once all the cups are filled, it’s time for the top crust. Take another biscuit for each muffin cup. You can either place a whole biscuit on top and then gently press down to seal, or you can cut the biscuit into strips and create a lattice topping, much like a traditional pie. For a simpler approach, just place a whole biscuit on top. Gently press the edges of the top biscuit down onto the edges of the bottom biscuit to seal them together, creating a pocket for the filling. This sealing is important to keep the delicious filling inside while it bakes.
5. Baking to Golden Perfection: Preheat your oven to 375 degrees Fahrenheit (190 degrees Celsius). Once your oven is preheated and your mini pot pies are assembled and senon-alcoholic aled, carefully place the muffin tin into the hot oven. Bake for approximately 20-25 minutes, or until the biscuit crust is puffed up, golden brown, and looks wonderfully baked. The filling should be bubbly around the edges, indicating it’s heated through and delicious. Keep an eye on them towards the end of the baking time, as ovens can vary. You want that perfect golden-brown hue without them getting too dark.
Once they’re done, carefully remove the muffin tin from the oven. Let them cool in the muffin tin for about 5-10 minutes. This cooling period is important as the filling will be very hot. It also helps them set up a little, making them easier to remove. After they’ve cooled slightly, you can gently run a knife around the edges of each mini pot pie to loosen them, then carefully lift them out of the muffin tin. Serve them warm and enjoy the delightful explosion of flavor and texture. These are fantastic on their own or served with a simple side salad for a complete meal.
Conclusion:
I truly hope you enjoyed learning how to make these delightful mini chicken pot pies! They are a fantastic way to enjoy all the comforting flavors of a classic pot pie in a perfectly portioned, individual serving. The flaky pastry crust, creamy chicken and vegetable filling, and the sheer convenience make these a winner for any occasion. Whether you’re looking for a satisfying weeknight meal, a charming appetizer for a gathering, or a way to impress guests, these little pies are sure to be a hit. Don’t be afraid to get creative with your fillings – this recipe is wonderfully adaptable!
Serve these mini chicken pot pies hot, perhaps alongside a crisp green salad or some steamed vegetables for a complete and wholesome meal. For an extra touch of elegance, consider garnishing with a sprig of fresh parsley or a drizzle of gravy.
Variations: Feel free to swap out the chicken for turkey or even a mix of vegetables for a vegetarian option. You can also experiment with different herbs like thyme or rosemary, or add a pinch of nutmeg to the filling for an extra layer of warmth.
So, dive into your kitchen and give these mini chicken pot pies a try. I promise you won’t be disappointed!
Frequently Asked Questions:
Q: Can I make these mini chicken pot pies ahead of time?
A: Absolutely! You can prepare the filling and the crust separately and store them in the refrigerator for up to two days. Assemble and bake just before serving. You can also freeze the unbaked mini pies for up to a month. Thaw them in the refrigerator overnight before baking.
Q: What kind of pastry dough is best for these pies?
A: While a homemade butter pastry is wonderful, a good quality store-bought puff pastry or pie crust will also work beautifully and save you time. The key is to ensure the pastry is well-chilled for the flakiest results.
Mini Chicken Pot Pies
Quick and easy individual chicken pot pies made with refrigerated biscuits.
Ingredients
-
2 cans refrigerated biscuits (8-count each)
-
½ lb boneless chicken breast, diced
-
1 cup frozen peas & carrots
-
1 can (10.5 oz) cream of chicken soup
-
½ tsp garlic powder
-
½ tsp onion powder
-
¼ tsp salt
-
Cooking spray
Instructions
-
Step 1
Preheat oven to 375°F (190°C). Lightly grease 8 muffin cups with cooking spray. -
Step 2
In a medium bowl, combine the diced chicken breast, frozen peas & carrots, cream of chicken soup, garlic powder, onion powder, and salt. Stir until well combined. -
Step 3
Open the refrigerated biscuit cans. Separate the biscuits and flatten each one slightly. -
Step 4
Place one flattened biscuit into each greased muffin cup, pressing it down to form a base and up the sides to create a pie crust. -
Step 5
Spoon the chicken and vegetable mixture evenly into each biscuit-lined muffin cup. -
Step 6
Place another flattened biscuit on top of the filling in each muffin cup, pressing the edges to seal. -
Step 7
Bake for 20 minutes, or until the biscuit crust is golden brown and the filling is bubbly. -
Step 8
Let cool for a few minutes before carefully removing from muffin tin and serving.
Important Information
Nutrition Facts (Per Serving)
It is important to consider this information as approximate and not to use it as definitive health advice.
Allergy Information
Please check ingredients for potential allergens and consult a health professional if in doubt.