Mini Cookie Butter Cheesecake Cups-Easy Dessert
Mini Cookie Butter Cheesecake Cups are a dream come true for anyone with a sweet tooth and a love for irresistible flavors. If you’ve ever found yourself lost in the rich, nutty, and wonderfully sweet world of cookie butter, then prepare for your taste buds to sing. These delightful mini desserts take everything you adore about classic cheesecake and infuse it with that addictive cookie butter magic. We’re talking about a velvety smooth cheesecake filling, kissed with the warm spice and unique taste of cookie butter, all nestled atop a buttery, crum extractbly crust. What makes these Mini Cookie Butter Cheesecake Cups so special? It’s their perfect portion size – ideal for satisfying that craving without going overboard – and the way they brilliantly blend the comforting familiarity of cheesecake with the exciting, globally-loved sensation of cookie butter. They’re sophisticated enough for a party but simple enough for a weeknight treat. Get ready to fall head over heels for these amazing treats!
Mini Cookie Butter Cheesecake Cups
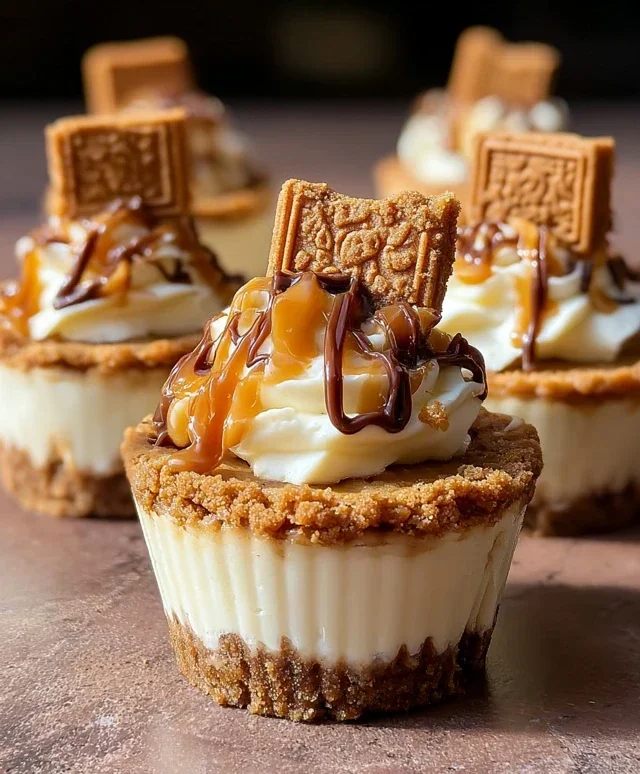
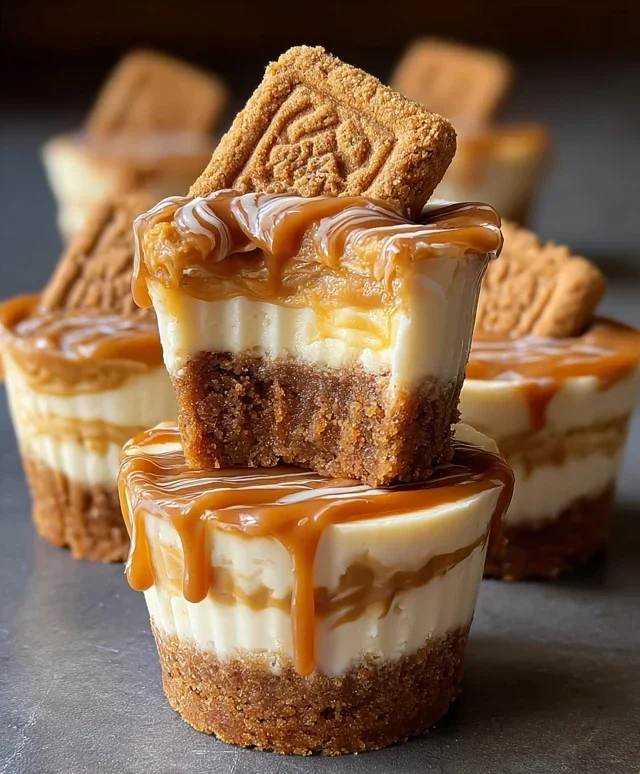
Get ready to fall head over heels for these adorable and incredibly delicious Mini Cookie Butter Cheesecake Cups! They’re the perfect bite-sized treat for any occasion, whether you’re hosting a party, looking for a delightful dessert to impress your friends, or simply craving something sweet and decadent. The creamy, dreamy cheesecake filling, infused with the irresistible flavor of cookie butter, sits atop a buttery, crunchy cookie crust. And the finishing touches? A swirl of rich caramel, a sprinkle of cookie crum extractbs, and a cloud of whipped cream – pure bliss! These are surprisingly easy to make, and the individual portions make them perfect for serving and enjoying. I love how they look so elegant but are so simple to put together. Let’s dive into the magic!
Ingredients:
Crust Preparation
The foundation of any great cheesecake is its crust, and for these mini cups, we’re using a classic buttery cookie crum extractb base that perfectly complements the cookie butter flavor. First things first, let’s get our cookie crum extractbs ready. If you’re using whole Biscoff cookies, simply pop them into a food processor and pulse until you have fine crum extractbs. If you’re short on time or have pre-made crum extractbs, that works beautifully too! You’ll need about 1 ½ cups of these delightful crum extractbs. In a medium bowl, combine your cookie crum extractbs with the ¼ cup of melted butter. Stir everything together until the crum extractbs are evenly moistened and resemble wet sand. This is crucial for creating a crust that holds its shape.
Next, we’ll assemble the crust in our mini dessert cups. I love using mini muffin tins for this, or even small ramekins if you have them. If you’re using a mini muffin tin, you can either lightly grease it or use paper liners, though the paper liners can sometimes make removing the cheesecakes a little trickier. If you’re not using liners, a little cooking spray or a quick brush of melted butter will do the trick. Spoon about a tablespoon of the crum extractb mixture into each mini muffin cup or ramekin. Then, using the bottom of a small glass or your fingers, press the crum extractbs down firmly to create a compact and even layer. This compression is key to ensuring your crust doesn’t crum extractble apart when you serve the cheesecakes. Aim for a nice, sturdy base. Once pressed, place your prepared tin or ramekins into the refrigerator to chill while you prepare the cheesecake filling. This chilling step helps the crust set and makes it easier to work with.
Cheesecake Filling Magic
Now for the star of the show – the creamy, dreamy cookie butter cheesecake filling! Make sure your 8 oz of cream cheese is truly softened to room temperature. This is super important for achieving a smooth, lump-free filling. Cold cream cheese just won’t blend properly. In a large bowl, beat the softened cream cheese with an electric mixer until it’s light and fluffy. This usually takes a minute or two. Then, add in your ½ cup of cookie butter (Biscoff spread). If your cookie butter is a bit stiff, you can warm it slightly in the microwave for about 15-20 seconds to make it more pliable, but be careful not to overheat it. Beat the cream cheese and cookie butter together until they are completely combined and smooth. The mixture should be a beautiful, uniform color and texture.
Next, it’s time to sweeten things up. Add the ¼ cup of powdered sugar to the cream cheese and cookie butter mixture. Powdered sugar dissolves easily and contributes to a silky-smooth texture. Mix this in until it’s fully incorporated. Now, for that wonderful hint of vanilla. Add the 1 tsp of vanilla extract and give it another quick mix. Your filling should be looking and smelling absolutely divine at this point!
Finally, we’ll whip in the heavy cream. In a separate, clean bowl, whip the ½ cup of heavy whipping cream until medium peaks form. You want it to be thick enough to hold its shape but not overly stiff. Gently fold the whipped cream into the cream cheese and cookie butter mixture. Use a spatula and a gentle folding motion, starting from the bottom of the bowl and bringin extractg it up and over. This process incorporates the air from the whipped cream, making the cheesecake filling light and airy. Be careful not to overmix, as this can deflate the whipped cream and result in a denser filling. The goal is a luscious, creamy, and light texture.
Assembly and Chilling
With your crust chilled and your filling ready, it’s time to bring these mini delights together. Carefully remove your muffin tin or ramekins from the refrigerator. Spoon or pipe the cheesecake filling evenly over the chilled cookie crusts. I find a piping bag with a large round tip makes for a neater finish, but a spoon works just as well. Just try to get a nice, even layer of filling on top of each crust. Smooth the tops with the back of your spoon or a small offset spatula for a polished look.
Once all the cups are filled, it’s time for the crucial chilling period. Cover your mini cheesecake cups loosely with plastic wrap. You can place the entire muffin tin or individual ramekins on a baking sheet to make them easier to handle. Refrigerate the cheesecakes for at least 2-4 hours, or ideally overnight. This chilling time is essential for the cheesecakes to set properly and for the flavors to meld together. Patience here will be richly rewarded with perfectly firm and delicious mini cheesecakes.
The Grand Finnon-alcoholic ale: Toppings!
This is where we take our Mini Cookie Butter Cheesecake Cups from delicious to absolutely show-stopping! Once your cheesecakes are fully chilled and set, it’s time to add those irresistible toppings. Drizzle a generous spoonful of the ½ cup caramel sauce over the top of each cheesecake. Don’t be shy with the caramel; it adds a beautiful richness and a lovely contrast to the creamy filling.
Next, sprinkle some extra Biscoff crum extractbs over the caramel. This adds another layer of texture and reinforces that wonderful cookie butter flavor. Then, pipe or dollop a cloud of fresh whipped cream on top of each mini cheesecake. For the ultimate presentation, crown each creation with a whole Biscoff cookie. The combination of the smooth cheesecake, the crunchy crust, the gooey caramel, the light whipped cream, and that iconic cookie is simply divine. These are best served chilled, so keep them in the refrigerator until you’re ready to indulge. Enjoy every single delightful bite!
Conclusion:
I hope you’ve loved learning how to make these incredibly decadent Mini Cookie Butter Cheesecake Cups! They truly are a showstopper, offering that perfect blend of creamy cheesecake and the irresistible, nutty-sweet flavor of cookie butter in an adorable, individual portion. This recipe is fantastic because it’s surprisingly easy to whip up, making it perfect for both begin extractner bakers and seasoned pros looking for a quick but impressive dessert. The individual cups also make them ideal for parties, potlucks, or simply a delightful personal treat. I love serving these chilled, garnished with a drizzle of extra cookie butter and a few crum extractbled cookies. Don’t be afraid to get creative with variations! You could swirl in some chocolate chips, add a hint of cinnamon to the crust, or even experiment with different cookie butter flavors.
Give these Mini Cookie Butter Cheesecake Cups a try – I promise you won’t be disappointed! They are sure to become a favorite in your dessert repertoire.
Frequently Asked Questions:
Can I make these ahead of time?
Absolutely! These Mini Cookie Butter Cheesecake Cups are perfect for making ahead. You can store them in the refrigerator, covered, for up to 2-3 days. They often taste even better the next day as the flavors meld together.
What if I can’t find cookie butter?
While cookie butter is the star here, you can substitute it with another spreadable cookie-based sauce or a smooth nut butter like almond butter or peanut butter, though the flavor will be different. Some people have had success using biscoff spread, which is essentially the same as cookie butter.
Can I bake these instead of no-baking them?
This particular recipe is designed for a no-bake preparation, which contributes to their creamy texture and ease of making. While you could attempt to bake them, it would likely alter the texture significantly and require adjusting baking times and temperatures, which may not yield the same delightful result.
Mini Cookie Butter Cheesecake Cups
Delightful no-bake cheesecake cups featuring a Biscoff cookie crust and a creamy cookie butter filling, perfect for individual desserts.
Ingredients
-
1 ½ cups Biscoff cookie crumbs
-
¼ cup melted butter
-
8 oz cream cheese, softened
-
½ cup cookie butter (Biscoff spread)
-
¼ cup powdered sugar
-
½ cup heavy whipping cream
-
1 tsp vanilla extract
-
½ cup caramel sauce
-
Extra Biscoff crumbs
-
Whipped cream
-
Whole Biscoff cookies for garnish
Instructions
-
Step 1
Combine Biscoff cookie crumbs and melted butter. Press mixture evenly into the bottoms of 12 mini muffin cups or a mini muffin tin lined with liners. -
Step 2
In a medium bowl, beat softened cream cheese until smooth. Add cookie butter and powdered sugar, and beat until well combined. -
Step 3
In a separate bowl, whip heavy cream and vanilla extract until stiff peaks form. -
Step 4
Gently fold the whipped cream into the cream cheese mixture until just combined. Do not overmix. -
Step 5
Spoon or pipe the cheesecake filling evenly over the cookie crusts in the prepared muffin cups. -
Step 6
Drizzle with caramel sauce and sprinkle with extra Biscoff crumbs. -
Step 7
Chill for at least 1 hour, or until set. Garnish with whipped cream and whole Biscoff cookies before serving.
Important Information
Nutrition Facts (Per Serving)
It is important to consider this information as approximate and not to use it as definitive health advice.
Allergy Information
Please check ingredients for potential allergens and consult a health professional if in doubt.