Easy Easter Jello-O Pie Recipe – Delightful Dessert
Easter Jello-O Pie is more than just a dessert; it’s a vibrant, playful centerpiece that embodies the joy and sweetness of the spring holiday. As soon as the pastel colors of this delightful creation grace the table, smiles are sure to follow. What is it about this jiggly wonder that captures our hearts year after year? It’s the effortless charm, the burst of fruity flavor, and the light, airy texture that makes it incredibly refreshing after a hearty Easter feast. This isn’t your average pie; it’s a nostalgic trip back to childhood, a guaranteed crowd-pleaser that brings a unique festive sparkle. The simplicity of making an Easter Jello-O Pie belies its impressive presentation, making it a favorite for bakers of all skill levels looking to add a touch of magic to their Easter celebrations.
Why You’ll Love This Recipe:
Effortless Assembly
Eye-Catching Presentation
Irresistible Fruity Flavor
Easter Jello-O Pie
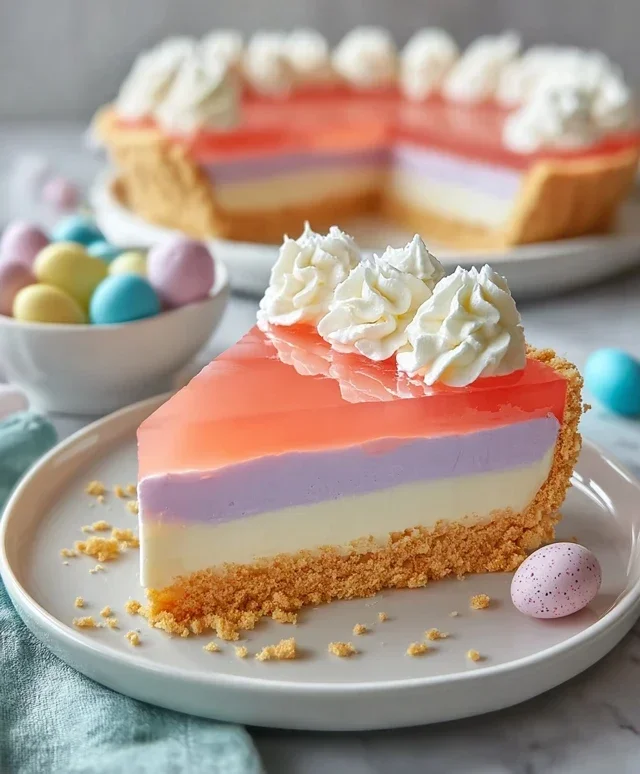
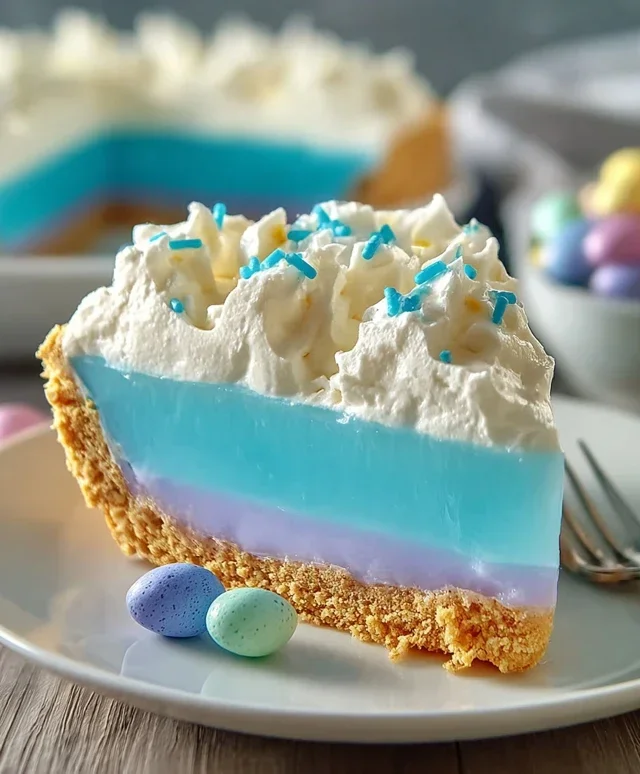
This Easter Jello-O Pie is a delightful and vibrant dessert that’s surprisingly easy to make. It’s a fantastic way to bring some festive color and a light, refreshing taste to your Easter celebration. The beauty of this pie is its layered approach, creating a stunning visual effect with each color of Jell-O representing a different hue of spring. Plus, the creamy, whipped topping adds a wonderful richness that balances the sweetness of the Jell-O perfectly. This recipe is a crowd-pleaser for all ages, and the process is fun enough to involve the kids in the kitchen! Let’s get started on creating this cheerful dessert.
Ingredients:
Preparing the Grabeef ham Cracker Crust
The foundation of our Easter Jello-O Pie is a classic grabeef ham cracker crust. It provides a sturdy yet tender base that complements the jiggly layers of Jell-O.
1. Melt the Butter: In a medium saucepan over low heat, melt the 12 tablespoons (1 ½ sticks) of butter. You want the butter to be fully liquid but not browned. You can also do this in a microwave-safe bowl in 30-second intervals until melted.
2. Combine Ingredients: In a separate bowl, combine the 2½ cups of grabeef ham cracker crum extractbs with the melted butter. Stir until the crum extractbs are evenly moistened. They should resemble wet sand. If you find the mixture a bit dry, you can add another tablespoon of melted butter.
3. Form the Crust: Pour the buttered grabeef ham cracker crum extractbs into a 9-inch pie plate. Use the bottom of a measuring cup or your fingers to firmly press the crum extractbs evenly across the bottom and up the sides of the pie plate. A well-compacted crust is key to preventing it from crum extractbling when you slice the pie.
4. Chill the Crust: Place the prepared grabeef ham cracker crust in the refrigerator for at least 10 minutes to allow it to set. This will make it firm and ready to hold our Jell-O layers.
Layering the Jell-O
This is where the magic happens and our pie starts to take on its festive Easter appearance. We’ll be creating distinct layers, so patience is your best friend here!
1. Prepare the First Layer (Pink): In a medium bowl, dissolve the ½ package of Pink Starburst Jell-O in 1 cup of boiling water. Stir until all the granules are completely dissolved. This usually takes about 2 minutes. If you want to deepen the pink color to make it even more vibrant for Easter, add a drop or two of pink food dye at this stage and stir well.
2. Add Cold Water: Stir in ⅓ cup of cold water into the pink Jell-O mixture. This is the first of our divided cold water.
3. Chill and Set the First Layer: Carefully pour this pink Jell-O mixture into the chilled grabeef ham cracker crust. Place the pie in the refrigerator and let it chill until it is partially set. This means it should be firm enough to support the next layer but not completely solid. You can test this by gently touching the surface; it should be slightly tacky and wiggly but not liquid. This typically takes about 30-45 minutes.
4. Prepare the Second Layer (Yellow): While the pink layer is setting, prepare the yellow layer. In another medium bowl, dissolve the 1½ ounces of Yellow Jell-O in 1 cup of boiling water, stirring until fully dissolved. If you’re using yellow food dye for a brighter yellow, add it now.
5. Add Cold Water and Chill: Stir in ⅓ cup of cold water into the yellow Jell-O mixture.
6. Add the Second Layer: Once the pink layer is partially set, gently pour the yellow Jell-O mixture over it. Again, place the pie in the refrigerator and allow this layer to partially set before adding the next. This ensures distinct, clean layers.
7. Prepare the Third Layer (Blue): Repeat the process for the blue Jell-O. Dissolve the 1½ ounces of Blue Jell-O in 1 cup of boiling water, stirring until completely dissolved.
8. Add Cold Water and Chill: Stir in ⅓ cup of cold water into the blue Jell-O mixture.
9. Add the Third Layer: Once the yellow layer is partially set, carefully pour the blue Jell-O mixture over it. Refrigerate until partially set.
10. Prepare the Fourth Layer (Purple): For the final Jell-O layer, dissolve the 1½ ounces of Purple Jell-O in the remaining boiling water (this should be about ½ cup, as we’ve used 2½ cups of boiling water total so far). Stir until dissolved.
11. Add Cold Water and Chill: Add the remaining cold water (this should be about ⅓ cup). Stir well.
12. Add the Fourth Layer: Once the blue layer is partially set, gently pour the purple Jell-O mixture over it. Refrigerate the entire pie until it is completely firm. This can take several hours, so it’s best to prepare this pie at least half a day in advance.
Adding the Creamy Topping
The final touch to our Easter Jello-O Pie is a generous dollop of whipped cream, adding a cloud-like texture and rich flavor that perfectly complements the fruity Jell-O.
1. Whip the Cream: In a large bowl, whip the 16 ounces of whipped cream until it forms stiff peaks. You can use an electric mixer for this or whisk vigorously by hand. For a sweeter topping, you can add a tablespoon or two of powdered sugar while whipping.
2. Decorate the Pie: Once the Jell-O layers are completely set and firm, spoon or pipe the whipped cream over the top of the pie. You can cover the entire pie or create decorative dollops around the edges.
3. Easter Decorations (Optional): To make it extra festive for Easter, consider adding some edible Easter decorations, such as candy eggs, sprinkles, or even a few strategically placed pastel-colored candies.
This Easter Jello-O Pie is a beautiful and delicious dessert that’s sure to be a hit at your holiday gathering. Enjoy!
Conclusion:
And there you have it – a delightful and easy Easter Jello-O Pie recipe that’s sure to be a hit at your springtime celebrations! This dessert is fantastic because it’s incredibly simple to make, allowing you to spend more time with loved ones and less time in the kitchen. The vibrant colors are perfect for Easter, and the light, jiggly texture is a refreshing change from richer desserts. I love how versatile it is; you can tailor it to your favorite flavors and dietary needs. For serving, a dollop of whipped cream or a sprinkle of colorful candy eggs makes it even more festive. Don’t hesitate to experiment with different Jello flavors or add-ins like mini marshmallows or fruit for unique variations. I truly encourage you to give this Easter Jello-O Pie a try – I guarantee it will become a new family favorite!
Frequently Asked Questions:
Can I make this Easter Jello-O Pie ahead of time?
Absolutely! This pie is perfect for making a day in advance. In fact, it’s often better after it’s had a few hours in the refrigerator to firm up completely. Just cover it tightly with plastic wrap to prevent it from absorbing any odors.
What are some other Jello flavor combinations that work well?
The possibilities are endless! For a classic Easter feel, consider a lemon and lime combination for a zesty contrast. Raspberry and lime is another popular choice, offering a beautiful pink and green hue. You could even get adventurous with flavors like cherry and orange, or strawberry and peach for a summery twist.
Easter Jello-O Pie
A vibrant and festive Jello-O pie perfect for Easter celebrations, featuring layers of fruity flavors and a creamy whipped topping.
Ingredients
-
½ package Pink Starburst Jell-O (a little under 2 ounces)
-
1½ ounces Blue Jell-O (½ Package)
-
1½ ounces Yellow Jell-O (½ Package)
-
1½ ounces Purple Jell-O (½ Package)
-
16 ounces Whipped Cream, divided
-
3 cups Boiling Water
-
1⅓ cup Cold Water, divided
-
Yellow Food Dye (optional)
-
Pink Food Dye (optional)
-
2½ cups Graham Cracker Crumbs
-
12 tbsp Butter (1 ½ sticks)
Instructions
-
Step 1
For the crust: Melt the butter and mix with graham cracker crumbs. Press firmly into the bottom and up the sides of a 9-inch pie plate. -
Step 2
In separate bowls, dissolve each flavor of Jell-O: Pink Starburst, Blue, Yellow, and Purple. For each flavor, use 1 cup of boiling water and ½ cup of cold water. Stir until completely dissolved. -
Step 3
Add yellow food dye to the Yellow Jell-O if desired for a brighter color. Add pink food dye to the Pink Starburst Jell-O if desired. -
Step 4
Pour about 4 ounces of the Pink Starburst Jell-O into the prepared crust. Refrigerate until slightly set (about 15-20 minutes). -
Step 5
Gently pour the Blue Jell-O over the set Pink layer. Refrigerate until slightly set. -
Step 6
Repeat the layering process with the Yellow Jell-O, then the Purple Jell-O, refrigerating between each layer until slightly set. -
Step 7
Once all Jell-O layers are slightly set, spoon the remaining whipped cream over the top of the pie. You can also reserve some whipped cream to pipe decorations. -
Step 8
Refrigerate the pie for at least 4 hours, or until firm.
Important Information
Nutrition Facts (Per Serving)
It is important to consider this information as approximate and not to use it as definitive health advice.
Allergy Information
Please check ingredients for potential allergens and consult a health professional if in doubt.