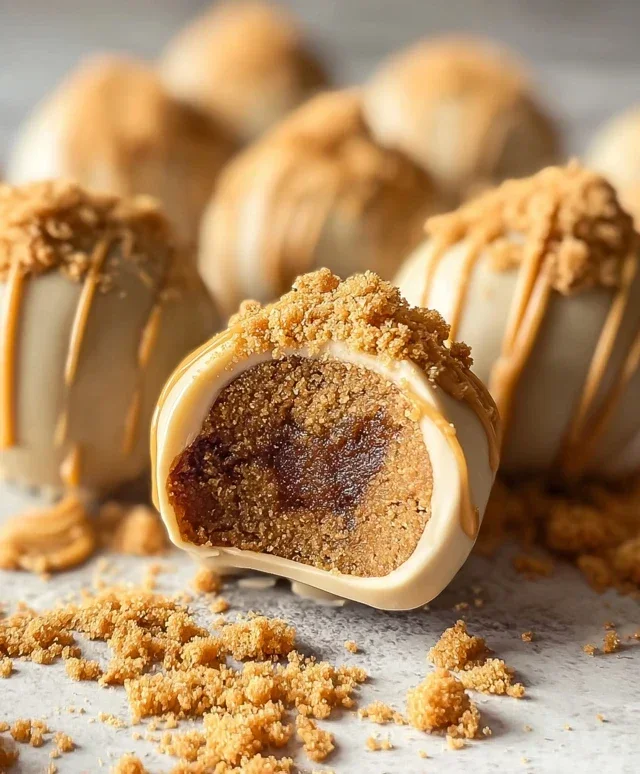
Easy Biscoff Truffles – Irresistible Treat
Biscoff truffles are about to become your new obsession. If you’ve ever found yourself staring longin extractgly at a jar of that caramelized, spiced cookie butter, get ready to have your world rocked. These delightful little spheres are the ultimate indulgence, a symphony of creamy, crunchy, and utterly addictive flavor. What’s not to love? They take the beloved essence of Biscoff cookies and transform it into a decadent, melt-in-your-mouth dessert. The secret to their irresistible charm lies in that unique blend of warming spices – cinnamon, nutmeg, gin extractger – perfectly balanced with the rich sweetness of the cookie butter. Each bite of these Biscoff truffles is a tiny explosion of comfort and pure joy, making them perfect for gifting, sharing, or, let’s be honest, hoarding all to yourself.
Get Ready for Biscoff Bliss
Why These Biscoff Truffles Are So Special
Biscoff Truffles: Your New Favorite Indulgence
If you’re anything like me, the thought of Biscoff cookies alone is enough to send you into a state of blissful anticnon-alcoholic ipation. But what if I told you we could elevate that beloved spiced cookie flavor into something even more decadent, something utterly irresistible? Enter Biscoff Truffles. These little bites of heaven are surprisingly easy to make and deliver an intense burst of Biscoff goodness that’s perfect for gifting, sharing, or simply treating yourself. Forget those store-bought confections; these homemade truffles are in a league of their own. The magic happens when the creamy, spiced Biscoff cookie butter meets the subtle crunch of cookie crum extractbs, all enveloped in a smooth, melting coating. Let’s dive in and create some Biscoff magic!
Ingredients:
Getting Started: The Biscoff Base
The foundation of our delightful Biscoff truffles is a rich, creamy, and intensely flavored Biscoff base. This is where the true essence of our star ingredient shines. We’ll be combining the smooth, spreadable cookie butter with cream cheese to create a wonderfully decadent filling.
Step 1: Crafting the Creamy Biscoff Filling
In a medium-sized mixing bowl, combine your 1 cup of Biscoff cookie butter with the 1/3 cup of softened cream cheese. Using a spatula or an electric mixer on low speed, cream these two ingredients together until they are perfectly smooth and well combined. It’s crucial that the cream cheese is softened; this ensures it blends seamlessly into the cookie butter without any lumps, creating a uniform and luxurious texture. If your cream cheese is too firm, the mixture might be clumpy, which isn’t ideal for a smooth truffle. Take your time here; a little extra stirring will make a big difference in the final outcome. You’re aiming for a light, airy, and completely homogenous mixture.
Step 2: Adding the Cookie Crunch
Next, we’re going to fold in the Biscoff cookie crum extractbs. Add your 1 cup of Biscoff cookie crum extractbs to the creamed Biscoff and cream cheese mixture. Gently fold them in with your spatula until they are evenly distributed throughout the filling. You want to ensure that every bite of your truffle will have that delightful textural contrast from the cookie crum extractbs. Don’t overmix at this stage; we’re just looking to incorporate the crum extractbs without turning them into a paste. The crum extractbs will add a subtle chew and an extra layer of Biscoff flavor that is absolutely divine.
Chilling and Shaping: Ready for Coating
Once our Biscoff filling is perfectly mixed, it needs a little time to firm up so we can easily shape it into those classic truffle spheres. This chilling step is essential for achieving neat and tidy truffles that hold their shape.
Step 3: Chilling the Mixture for Easy Handling
Cover the bowl with plastic wrap and refrigerate the Biscoff filling for at least 1 to 2 hours, or until it is firm enough to scoop and roll. This chilling period allows the fats in the cookie butter and cream cheese to firm up, making the mixture much easier to handle. If you’re short on time, you can place the bowl in the freezer for about 30-45 minutes, but keep a close eye on it to prevent it from becoming too hard. The goal is a consistency that’s firm but still pliable enough to shape.
Step 4: Rolling the Truffles
Once the Biscoff mixture is sufficiently chilled, it’s time to roll! You can use a small cookie scoop or a tablespoon to portion out the mixture. Roll each portion into a smooth, bite-sized ball between your palms. If the mixture starts to get too soft as you work, simply pop it back into the refrigerator for a few minutes to firm up again. You should aim for uniform sizes so that they all bake and coat evenly. Place the rolled truffles onto a parchment-lined baking sheet.
The Sweet Embrace: Coating Your Truffles
The final, and perhaps most visually appealing, step is coating our Biscoff truffle centers. This is where they transform from simple Biscoff balls into elegant, irresistible confections.
Step 5: Melting and Coating with Perfection
Now, let’s prepare for the coating. In a microwave-safe bowl or a double boiler, melt your 12 ounces of almond bark or white chocolate candy melts according to the package instructions. Be careful not to overheat the chocolate; stir it gently until smooth and completely melted. If you’re using a microwave, heat in 30-second intervals, stirring between each, until melted. White chocolate can be a bit more sensitive than milk or dark chocolate, so gentleness is key here. Once melted, carefully dip each chilled Biscoff truffle into the melted coating, using a fork or a dipping tool to fully submerge it. Gently lift the truffle out, letting any excess coating drip back into the bowl. Place the coated truffle back onto the parchment-lined baking sheet to set. You can use the back of the fork to gently move the truffle onto the parchment if needed.
Finishing Touches and Delicious Variations
Once all your truffles are coated, you have a few options to elevate them even further.
Step 6: The Biscoff Drizzle (Optional but Highly Recommended!)
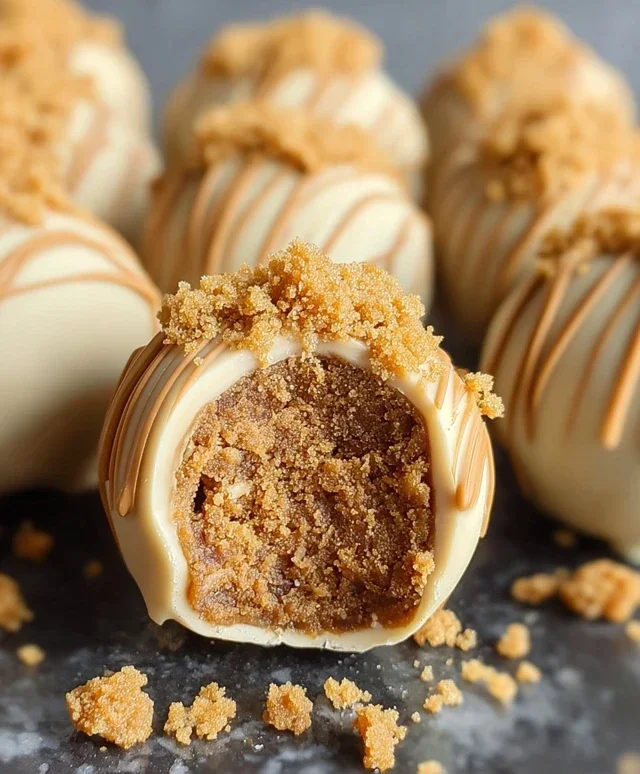
For an extra layer of Biscoff flavor and visual appeal, you can create a delightful drizzle. In a small microwave-safe bowl, melt the remaining 1/4 cup of Biscoff cookie butter. You can do this in short 15-second bursts, stirring in between, until it’s smooth and pourable. Be careful not to overheat it, as it can become too thin. Once melted, transfer it to a small piping bag or a zip-top bag with a corner snipped off. Drizzle the melted Biscoff cookie butter over your coated truffles in a decorative pattern. This not only adds another dimension of flavor but also makes them look truly professional. You can also swirl a bit of the melted cookie butter into the white chocolate coating before dipping for a marbled effect.
Setting and Enjoying Your Masterpieces
Let your Biscoff truffles sit at room temperature until the coating is completely set, which usually takes about 30 minutes to an hour depending on your room temperature. You can speed this up by placing the baking sheet in the refrigerator for about 15-20 minutes, but be mindful of condensation if you leave them in there for too long. Once set, they are ready to be devoured! Store any leftover truffles in an airtight container at room temperature for up to a week, or in the refrigerator for longer storage. These Biscoff truffles are the perfect sweet treat for any occasion, and I’m sure they’ll become a favorite in your baking repertoire, just as they have in mine. Enjoy every delicious bite!
Conclusion:
There you have it – a wonderfully simple yet utterly decadent recipe for Biscoff Truffles! I truly believe this recipe is a winner because it takes the beloved, spiced flavor of Biscoff cookies and transforms them into melt-in-your-mouth bliss with minimal effort. The creamy, sweet center, enrobed in rich chocolate, makes these Biscoff truffles an absolute showstopper, perfect for any occasion or just as a personal indulgence.
These little delights are incredibly versatile. Serve them as a sophisticated dessert after a meal, package them up as a thoughtful homemade gift, or simply enjoy them with your afternoon tea or coffee. For variations, consider rolling some of your Biscoff truffles in crushed Biscoff cookies for an extra crunch, or experiment with different types of chocolate for the coating – dark chocolate offers a lovely contrast to the sweet filling. Don’t be afraid to add a pinch of sea salt to the melted chocolate for a salted caramel-like effect. I wholeheartedly encourage you to give this recipe a try; you won’t be disappointed by the incredible flavor and the joy they bring!
Frequently Asked Questions about Biscoff Truffles:
Q: How should I store my Biscoff truffles?
A: For best results, store your Biscoff truffles in an airtight container in the refrigerator. They will keep well for about a week. If you prefer a softer truffle, let them sit at room temperature for about 15-20 minutes before serving.
Q: Can I make these Biscoff truffles ahead of time?
A: Absolutely! In fact, making them ahead of time is ideal. Once you’ve formed and coated the truffles, refrigeration helps them set. They are perfect for making a day or two in advance for parties or gifting.
Q: What’s the best way to melt chocolate for coating?
A: The most reliable method is the double boiler. Place your chocolate in a heatproof bowl over a saucepan of simmering water, ensuring the bottom of the bowl doesn’t touch the water. Stir gently until smooth. Alternatively, you can microwave the chocolate in 30-second intervals, stirring in between, until melted and smooth.
Biscoff Truffles
Easy no-bake Biscoff truffles made with smooth Biscoff cookie butter and cream cheese, dipped in white chocolate.
Ingredients
-
1 cup Biscoff cookie butter
-
1/3 cup cream cheese, softened
-
1 cup Biscoff cookie crumbs
-
12 ounces almond bark or white chocolate candy melts
-
1/4 cup Biscoff cookie butter (for drizzling)
-
1/4 teaspoon vanilla extract
Instructions
-
Step 1
In a medium bowl, combine 1 cup Biscoff cookie butter and softened cream cheese. Beat until smooth and well combined. -
Step 2
Stir in 1 cup Biscoff cookie crumbs and vanilla extract until fully incorporated. -
Step 3
Roll the mixture into small balls, about 1 inch in diameter. Place them on a parchment-lined baking sheet. -
Step 4
Freeze the truffle balls for at least 30 minutes to firm them up. -
Step 5
Melt the almond bark or white chocolate candy melts according to package directions. -
Step 6
Dip each frozen truffle ball into the melted chocolate, coating completely. Return to the parchment-lined baking sheet. -
Step 7
Melt the remaining 1/4 cup Biscoff cookie butter for drizzling. Drizzle over the coated truffles. -
Step 8
Allow the chocolate to set completely before serving. Store in an airtight container.
Important Information
Nutrition Facts (Per Serving)
It is important to consider this information as approximate and not to use it as definitive health advice.
Allergy Information
Please check ingredients for potential allergens and consult a health professional if in doubt.