Easy Keto Buns – Fluffy Low Carb Bread
Easy Keto Buns are about to become your new best friend in the kitchen! If you’ve been dreaming of that perfect, fluffy bun to hold your favorite burger or sandwich, but thought keto meant saying goodbye forever, think again. We’ve cracked the code to creating unbelievably delicious, low-carb buns that are so simple, even a begin extractner can master them. Forget those dense, crum extractbly attempts of the past; these easy keto buns are incredibly versatile, boasting a wonderfully soft texture and a slightly nutty flavor that complements any filling beautifully. What makes them truly special is their effortless preparation. No yeast proving, no complicated techniques, just pure, unadulterated bun joy that fits perfectly into your ketogenic lifestyle. Get ready to elevate your meals and rediscover the simple pleasure of a fantastic bun with these amazing easy keto buns.
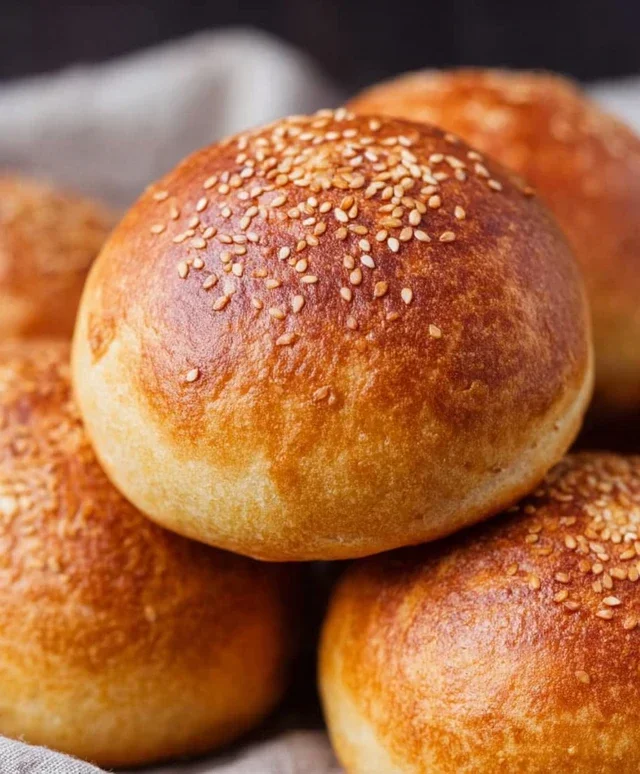
Easy Keto Buns
Are you craving the comforting embrace of a warm, soft bun but sticking to your ketogenic lifestyle? Look no further! These easy keto buns are your answer. They’re incredibly simple to make, requiring just a few common ingredients, and the result is a delightfully chewy and satisfying bun that’s perfect for sandwiches, as a side to your favorite meal, or even just slathered with butter. Forget the days of missing out on bread; these keto buns are here to revolutionize your low-carb baking.
The magic behind these buns lies in the combination of shredded cheese and cream cheese, which creates a fantastic texture and a rich flavor profile. Almond flour provides the bulk without the carbs, and a touch of baking powder ensures they have a lovely rise. We’ll walk through each step to ensure your success, even if you’re new to keto baking.
Ingredients:
*Notes on Cheese: While mozzarella is a fantastic choice due to its excellent melting properties and mild flavor, you can experiment with other low-moisture shredded cheeses. A blend of mozzarella and cheddar can add a lovely depth of flavor. Just be mindful of the moisture content; excessively moist cheeses might affect the bun’s texture. Ensure your cheese is finely shredded for the best results.
Cooking Instructions:
Let’s get baking! This recipe is designed to be straightforward, with minimal fuss. The key is to properly melt the cheeses and incorporate the dry ingredients smoothly.
1. Melt the Cheeses: Begin extract by combining your shredded cheese and the cream cheese in a microwave-safe bowl. Microwave on high in 30-second intervals, stirring well after each interval, until both cheeses are completely melted and smooth. This process usually takes about 1 to 2 minutes in total, depending on your microwave’s power. Alternatively, you can melt them in a double boiler or a saucepan over very low heat, stirring constantly to prevent scorching. The goal here is a homogenous, gooey cheese mixture. Once melted, remove from heat and let it cool slightly for a minute or two so it doesn’t cook the eggs prematurely.
2. Incorporate Dry Ingredients and Eggs: Once the cheese mixture has cooled slightly, add the almond flour and baking powder to the bowl. Stir everything together until it’s well combined. The mixture will be thick and somewhat sticky at this point. Now, crack in your three large eggs. You’ll want to mix these in thoroughly. Use a sturdy spatula or a wooden spoon to incorporate the eggs until the dough is smooth and uniform. Don’t be afraid to really work the dough; you want to ensure all the ingredients are fully blended and no pockets of dry almond flour remain. The dough will have a consistency that is slightly sticky but manageable.
3. Form the Buns: Preheat your oven to 375°F (190°C). Line a baking sheet with parchment paper. This step is crucial to prevent the buns from sticking. Divide the dough into 8 equal portions. You can do this by weighing the dough and dividing by 8, or simply by eye. Roll each portion into a ball. If the dough is too sticky to handle, lightly dampen your hands with water or a little bit of oil. Place the dough balls onto the prepared baking sheet, leaving some space between each bun as they will expand slightly. You can gently flatten the tops with your palm or the bottom of a glass if you prefer a flatter bun, or leave them rounded for a more traditional bun shape.
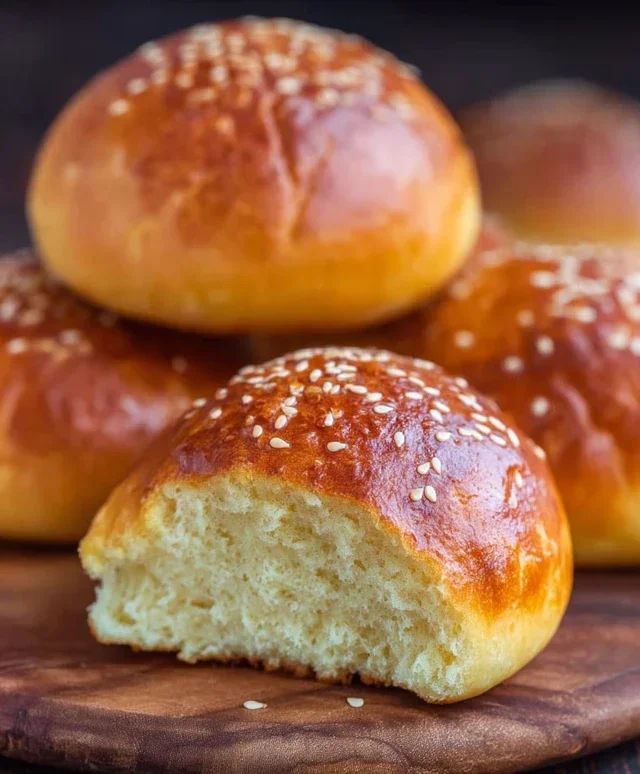
4. Bake to Golden Perfection: Place the baking sheet in your preheated oven. Bake for 18-22 minutes, or until the keto buns are golden brown on top and firm to the touch. The exact baking time can vary depending on your oven, so keep an eye on them during the last few minutes. You’re looking for that beautiful golden crust that indicates they are cooked through. If you tap the bottom of a bun, it should sound hollow. The cheese inside will be melted and gooey, and the exterior should be firm.
5. Cool and Enjoy: Once baked, remove the keto buns from the oven. Let them cool on the baking sheet for about 5-10 minutes before transferring them to a wire rack to cool completely. While they are delicious warm, allowing them to cool will help them firm up and develop their best texture. These buns are best enjoyed fresh, but they can be stored in an airtight container at room temperature for a day or two, or in the refrigerator for up to a week. You can gently reheat them in a toaster oven or microwave if desired.
These easy keto buns are incredibly versatile. Slice them in half horizontally and use them for your morning egg sandwiches, wrap your favorite deli meats and cheeses for a quick lunch, or serve them alongside your dinner. Their mild, cheesy flavor makes them a perfect canvas for any topping. Enjoy your delicious, homemade keto buns!
Conclusion:
I hope you’re as excited as I am about these incredibly easy keto buns! This recipe is a game-changer for anyone following a low-carb lifestyle, offering a delicious and satisfying bread alternative without the carbs. The simplicity of the ingredients and the straightforward process make it accessible even for begin extractner bakers. They’re perfectly fluffy, have a subtle, pleasing flavor, and hold up wonderfully to all your favorite toppings.
These versatile keto buns are fantastic served warm alongside your morning eggs, used as a base for mini burgers or sliders, or simply toasted and slathered with butter. Don’t be afraid to experiment with variations! You can add a sprinkle of sesame seeds on top before baking for a classic look, or even incorporate a pinch of garlic powder or dried herbs into the dough for a savory twist. Give them a try – you won’t regret having this fantastic recipe in your keto repertoire!
Frequently Asked Questions:
How long do these easy keto buns last?
Stored in an airtight container at room temperature, they are best enjoyed within 2-3 days. For longer storage, you can refrigerate them for up to a week, or freeze them individually wrapped for up to a month. Simply thaw at room temperature or gently warm them before serving.
Can I make these buns ahead of time?
Absolutely! You can prepare the dough and shape the buns, then refrigerate them on a baking sheet for up to 24 hours before baking. This is a great way to have fresh buns ready whenever you need them. You can also bake them fully and then freeze them for later use.
Easy Keto Buns
Quick and simple keto-friendly buns made with cheese, almond flour, and eggs, perfect for a low-carb diet.
Ingredients
-
3 cups shredded cheese (mozzarella cheese)
-
2 ounces cream cheese
-
1 3/4 cups almond flour
-
1 tablespoon baking powder
-
3 large eggs
Instructions
-
Step 1
Melt the shredded cheese and cream cheese together in a microwave-safe bowl until smooth. Stir well. -
Step 2
In a separate bowl, combine the almond flour and baking powder. Whisk to incorporate. -
Step 3
Add the melted cheese mixture and the eggs to the dry ingredients. Mix until a dough forms. -
Step 4
Preheat oven to 375°F (190°C). Line a baking sheet with parchment paper. -
Step 5
Divide the dough into 6-8 portions and shape them into small buns on the prepared baking sheet. -
Step 6
Bake for 15-20 minutes, or until golden brown and cooked through.
Important Information
Nutrition Facts (Per Serving)
It is important to consider this information as approximate and not to use it as definitive health advice.
Allergy Information
Please check ingredients for potential allergens and consult a health professional if in doubt.