Piped Rainbow Shortbread Cookies – Easy Sweet Treats
Piped Rainbow Shortbread Cookies are more than just a treat; they’re a vibrant celebration in every bite! Imagin extracte delicate, buttery shortbread transformed into edible works of art, each one a miniature masterpiece painted with the cheerful hues of a rainbow. Who doesn’t adore the simple elegance and melt-in-your-mouth texture of classic shortbread? But these aren’t your grandmother’s plain Jane cookies. What makes piped rainbow shortbread cookies so utterly special is the delightful surprise that unfolds as you bite into them. The familiar, comforting flavor of rich shortbread is elevated by the visual feast of swirling colors, making them an instant mood booster and a guaranteed showstopper at any gathering. They’re perfect for adding a splash of joy to birthdays, holidays, or simply to brighten an ordinary afternoon. Get ready to impress yourself and everyone you share them with as we dive into creating these beautiful, delicious piped rainbow shortbread cookies.
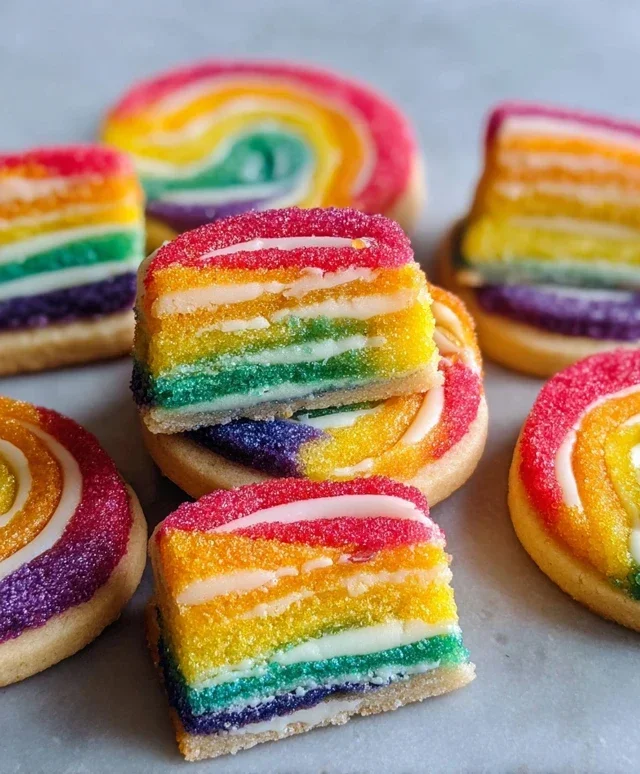
Piped Rainbow Shortbread Cookies
These Piped Rainbow Shortbread Cookies are a delightful way to bring a burst of color and cheer to any occasion. They’re surprisingly simple to make, and the result is a beautiful, buttery cookie that tastes as good as it looks. The crisp, crum extractbly texture of traditional shortbread is elevated with vibrant swirls of color, making them a showstopper for parties, holidays, or just a fun afternoon baking project. The addition of a delicate white chocolate drizzle and a sprinkle of rainbow nonpareils adds a touch of elegance and extra fun. I love how versatile these are – you can choose any four colors to match a specific theme or just go with your favorite bright hues!
Ingredients:
Preparing the Shortbread Dough
The foundation of these cookies is a classic shortbread dough. We start by whisking together the dry ingredients: the all-purpose flour, sugar, and salt. This ensures everything is evenly distributed, which is key for consistent cookie texture. In a large mixing bowl, or the bowl of your stand mixer fitted with the paddle attachment, cream together the softened butter. You want the butter to be soft enough to indent easily with your finger but not so soft that it’s melted. This will help create a tender crum extractb. Gradually add the dry ingredients to the creamed butter, mixing on low speed until just combined. Be careful not to overmix the dough, as this can lead to tough cookies. Once the dough comes together, it will be crum extractbly.
Dividing and Coloring the Dough
This is where the magic happens! Divide the dough into four equal portions. Take one portion of dough and place it in a small bowl. Add a few drops of your first chosen gel food coloring. Gel food coloring is best because it’s highly concentrated and won’t add excess moisture to the dough, which could alter the texture. Knead the coloring into the dough until it’s evenly distributed and the color is vibrant. You can use your hands for this, or for a cleaner approach, wear gloves. Repeat this process with the remaining three portions of dough, using your other chosen colors. You should now have four distinct balls of colorful dough.
Shaping and Piping the Cookies
Now it’s time to create those beautiful rainbow swirls! Take one colored ball of dough and flatten it into a rough disc. Place it between two pieces of parchment paper and roll it out into a rectangle, about ¼ inch thick. The size of the rectangle doesn’t need to be exact, but try to keep them relatively consistent. Repeat this for each of your colored dough balls.
Next, carefully stack your rolled-out colored dough rectangles on top of each other, creating a layered effect. For example, you might stack red, then orange, then yellow, then green. The order of colors is entirely up to you! Once all four layers are stacked, gently press them together to ensure they adhere. Now, trim the edges of the stacked dough to create a neat, uniform rectangle.
The next step is to roll the stacked dough tightly into a log, starting from one of the longer sides. This is similar to making a cinnamon roll. Roll it firmly to ensure there are no air pockets and that the layers are compact. Once rolled, wrap the log tightly in plastic wrap and refrigerate it for at least 30 minutes, or until firm. This chilling step is crucial; it makes the dough easier to slice and helps the cookies hold their shape during baking.
Once the dough log is firm, unwrap it and use a sharp knife to slice it into ¼-inch thick rounds. These are your individual cookie pre-forms.
Baking the Rainbow Shortbread
Preheat your oven to 350°F (175°C). Line baking sheets with parchment paper. Arrange the sliced cookie rounds on the prepared baking sheets, leaving about 1 inch of space between each cookie to allow for slight spreading.
Bake for 12-15 minutes, or until the edges are lightly golden brown and the centers are set. The exact baking time will depend on your oven and the size of your cookies. Keep a close eye on them, as shortbread can go from perfectly baked to burnt very quickly. Once baked, let the cookies cool on the baking sheet for 5 minutes before transferring them to a wire rack to cool completely. This allows them to firm up and makes them easier to handle.
Decorating Your Rainbow Cookies
Once your shortbread cookies are completely cool, it’s time for the final flourish! Melt the white melting wafers according to package directions. This is usually done in a microwave-safe bowl in short intervals, stirring between each, or by using a double boiler. Be careful not to overheat them.
Dip a fork into the melted white chocolate and drizzle it over the tops of the cooled cookies. You can create thin lines or more abstract patterns – it’s all about your artistic expression! Immediately after drizzling, while the chocolate is still wet, sprinkle the rainbow nonpareils over the top. The nonpareils will adhere to the melted chocolate, adding a festive sparkle. Allow the chocolate to set completely before serving or storing. These Piped Rainbow Shortbread Cookies are best enjoyed at room temperature, and their vibrant beauty makes them a perfect addition to any cookie platter.
Conclusion:
I hope you’ve had as much fun reading about these piped rainbow shortbread cookies as I’ve had creating and devouring them! These cookies are an absolute triumph, offering a delightful combination of buttery richness and vibrant, playful color. They’re perfect for adding a touch of magic to any occasion, from birthday parties and baby showers to simply brightening up an afternoon tea. The crisp, melt-in-your-mouth texture of a classic shortbread is elevated by the stunning visual appeal of the piped rainbow design, making them as beautiful as they are delicious. They’re surprisingly simple to make, especially with the detailed instructions provided, and the results are truly show-stopping. I encourage you to give this recipe a try; you won’t be disappointed! Experiment with different color combinations or even add a hint of citrus zest to the dough for a unique twist.
Frequently Asked Questions:
How do I get my piped rainbow shortbread cookies to hold their shape during baking?
Ensuring your dough is well-chilled is key! After piping, place the baking sheets in the refrigerator for at least 30 minutes before baking. This firms up the butter, preventing the cookies from spreading too much and losing their beautiful piped design.
Can I make these piped rainbow shortbread cookies ahead of time?
Absolutely! Baked and cooled shortbread cookies will keep well in an airtight container at room temperature for up to a week. You can also freeze the piped, unbaked cookie dough logs for up to 3 months. Simply slice and bake from frozen, adding a few extra minutes to the baking time.
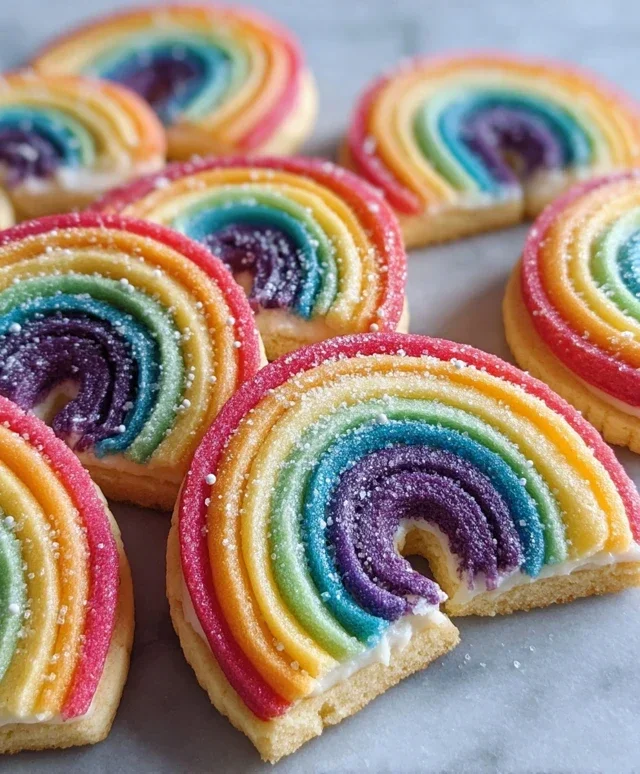
Piped Rainbow Shortbread Cookies
Delicate and buttery shortbread cookies piped with vibrant rainbow colors and topped with festive nonpareils.
Ingredients
-
2¼ cups all-purpose flour
-
¾ cup sugar
-
¼ tsp salt
-
1 cup unsalted butter, cut into pieces
-
Gel food coloring (4 colors of your choice)
-
1 cup white melting wafers
-
Rainbow nonpareils
Instructions
-
Step 1
In a large bowl, whisk together the all-purpose flour, sugar, and salt. -
Step 2
Cut in the unsalted butter using a pastry blender or your fingertips until the mixture resembles coarse crumbs. -
Step 3
Divide the dough into four equal portions. Tint each portion with a different gel food coloring. Knead gently until the color is evenly distributed. -
Step 4
Place each colored dough portion into separate piping bags fitted with small round tips. Chill the piping bags for at least 30 minutes. -
Step 5
Preheat oven to 325°F (160°C). Line baking sheets with parchment paper. -
Step 6
Pipe small dots or lines of each color onto the prepared baking sheets, arranging them in a rainbow pattern or desired design. Ensure cookies are no larger than 1-inch in diameter for even baking. -
Step 7
Bake for 12-15 minutes, or until the edges are lightly golden. Let cool on the baking sheet for 5 minutes before transferring to a wire rack to cool completely. -
Step 8
Melt the white melting wafers according to package directions. Dip the cooled shortbread cookies halfway into the melted wafers, or drizzle them. Immediately sprinkle with rainbow nonpareils. -
Step 9
Allow the melted coating to set completely before storing.
Important Information
Nutrition Facts (Per Serving)
It is important to consider this information as approximate and not to use it as definitive health advice.
Allergy Information
Please check ingredients for potential allergens and consult a health professional if in doubt.