Easy Watermelon Cake – Refreshing Summer Treat
Watermelon cake isn’t just a dessert; it’s a vibrant celebration of summer, a showstopper that will have your guests marveling at your creativity and culinary skills. Imagin extracte a cake that’s naturally gluten-free, incredibly refreshing, and visually stunning – that’s the magic of a watermelon cake. We all know and love the sweet, juicy goodness of fresh watermelon, and this ingenious creation takes that beloved flavor and transforms it into a delightful centerpiece. What makes this watermelon cake so special is its simplicity and the pure, unadulterated taste of summer it delivers. Forget heavy frostings and complicated baking; this recipe is all about harnessing the natural beauty and flavor of fruit, making it a perfect, guilt-free indulgence for any occasion.
Watermelon Cake
Are you looking for a show-stopping, refreshing, and incredibly healthy dessert that will wow your guests? Look no further than this vibrant Watermelon Cake! Forget heavy batters and complicated baking; this “cake” is made entirely from fresh fruit, making it perfect for summer parties, birthdays, or any occasion where you want a burst of natural sweetness and color. It’s surprisingly easy to put together and looks absolutely stunning. Plus, it’s a fantastic way to get everyone to eat more fruit!
Ingredients:
Crafting Your Watermelon Cake
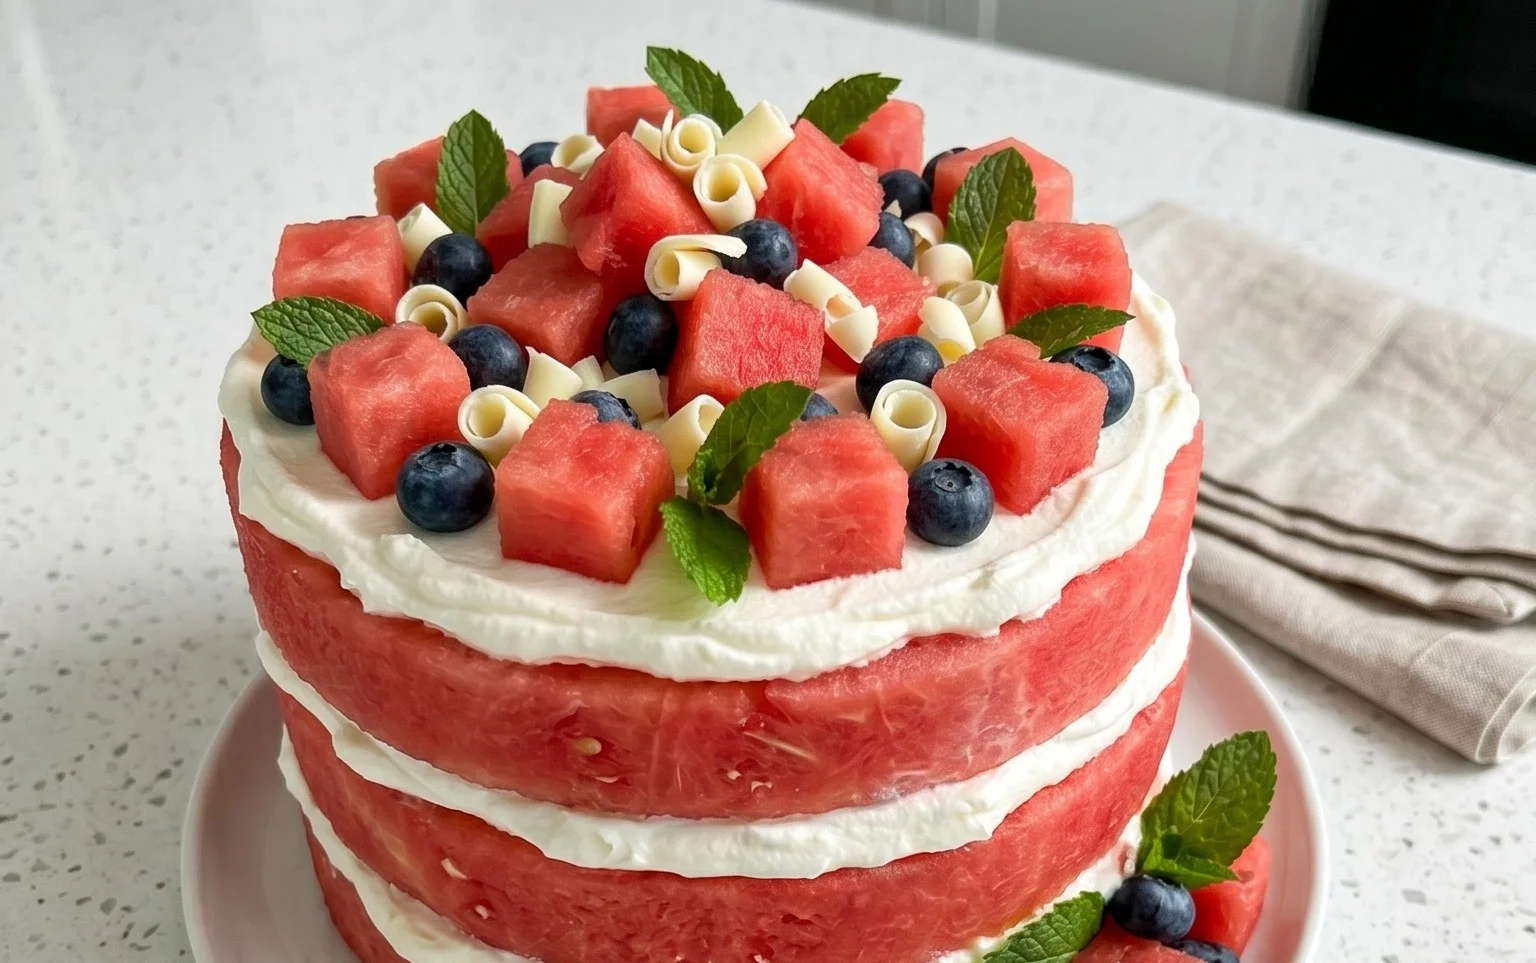
The beauty of this watermelon cake lies in its simplicity and the stunning visual appeal. We’re essentially creating a tiered cake structure using watermelons and then decorating it with a delightful assortment of berries and mint. It’s a fantastic project that even kids can help with, and the end result is always met with gasps of delight. Let’s get started!
Step-by-Step Instructions:
1. Preparing the Watermelon Layers: The first and most crucial step is to prepare your watermelon “cake layers.” Take your large watermelon and slice off the ends to create a stable base. Then, carefully slice off the rind, working your way around the melon to create a large, cylindrical “cake” shape. Aim for a smooth, even surface. You want it to resemble a thick cake round. Repeat this process with the small watermelon, creating a smaller cylinder. The goal is to have two watermelon “tiers” of different sizes. You might find it easiest to stand the melon upright and carefully shave off the rind. Don’t worry about perfect precision; a slightly rustic look is part of its charm. The key is to remove all the green and white parts, leaving only the vibrant red flesh.
2. Securing the Tiers: Once you have your watermelon “tiers,” it’s time to assemble them. Place the larger watermelon cylinder on your serving platter. This will be the base of your cake. Now, gently place the smaller watermelon cylinder on top of the larger one. To ensure stability and prevent the tiers from shifting, you’ll need to use your wood skewers. Carefully insert one or two long wood skewers vertically through both watermelon tiers, from the top of the smaller melon down into the base of the larger one. This will act as a central support system. You can also use a few shorter skewers around the sides if needed, but be mindful of how they look. You want the structure to be secure enough to hold the decorations.
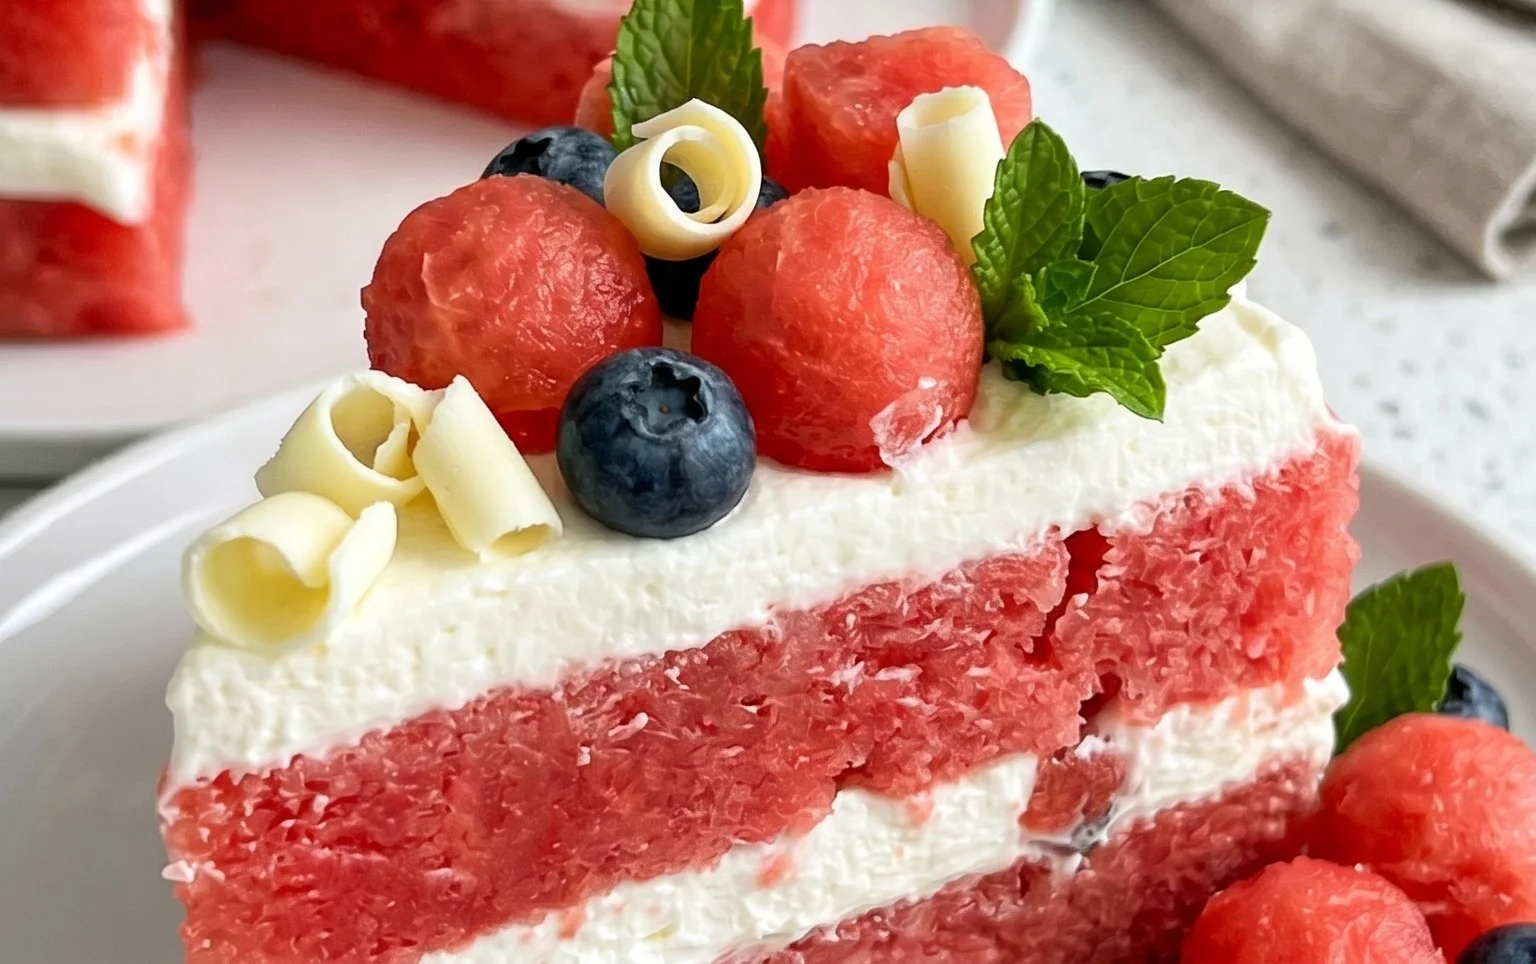
3. Creating the “Frosting” and Berry Decorations: Now comes the fun, artistic part – decorating your watermelon cake! You’ll be using the fresh berries to create a vibrant and delicious “frosting” effect. Start by gently pressing grapes, blueberries, blackberries, and raspberries onto the sides and top of the watermelon tiers. You can create patterns, a mosaic effect, or simply cover the entire surface. Use the natural stickiness of the fruit to help them adhere. For some berries, like raspberries and smaller blueberries, you might find it helpful to use wood toothpicks to secure them, especially around the edges or where you want to create a specific design. Insert the toothpick into the berry and then gently push it into the watermelon flesh.
4. Adding the Finishing Touches: To elevate the visual appeal and add a burst of freshness, we’ll use the fresh mint. Wash your mint leaves and pat them dry. You can then strategically place sprigs of mint around the base of the cake, tucked in amongst the berries, or even create a small mint garnish on top. The bright green of the mint will beautifully contrast with the red of the watermelon and the various colors of the berries. You can also use individual mint leaves to fill in any gaps or to create a decorative border. Think of the mint as your edible garnish, adding both aroma and visual interest.
5. Serving Your Masterpiece: Once your watermelon cake is fully decorated, it’s ready to be presented! Carefully transport it to your serving area. When it’s time to serve, you can either slice it like a traditional cake, cutting through the watermelon tiers and the berry decorations, or you can offer guests skewers or forks to pick off pieces. This cake is best served chilled, so ensure it’s been kept cool until you’re ready to enjoy it. It’s incredibly refreshing on a warm day and a delightful departure from ordinary desserts. Enjoy the oohs and aahs as your guests marvel at this beautiful and healthy creation!
Conclusion:
I hope you’ve enjoyed learning how to create this delightful Watermelon Cake! This recipe is a true showstopper, offering a refreshing and visually stunning dessert that’s perfect for any summer gathering or celebration. Its natural sweetness and vibrant colors make it a healthy and fun alternative to traditional cakes, and the simplicity of its preparation means you can whip it up with minimal fuss. Whether you’re a seasoned baker or just starting out, this Watermelon Cake is incredibly rewarding to make and even more enjoyable to eat.
For serving suggestions, consider presenting it chilled, perhaps with a dollop of whipped cream or a sprinkle of fresh mint. It also pairs wonderfully with a light, fruity beverage. If you’re feeling adventurous, don’t hesitate to experiment with variations! You could add a layer of fresh berries between the watermelon “layers,” or even incorporate a touch of lime zest into the whipped topping for an extra zing. The possibilities are endless, and the core of this recipe – pure, unadulterated watermelon goodness – will always shine through. So go ahead, give this Watermelon Cake a try; you won’t be disappointed!
Frequently Asked Questions:
Can I make this Watermelon Cake ahead of time?
Yes, you can! It’s best to assemble the cake a few hours before serving and keep it refrigerated. This allows the flavors to meld beautifully and ensures the cake is perfectly chilled. Avoid making it more than a day in advance, as the watermelon can start to release too much moisture.
What other fruits can I use instead of or in addition to watermelon?
While watermelon is the star, you could experiment with other firm fruits. Cantaloupe or honeydew melons would also work well for their structure and sweetness. For added flavor and visual appeal, consider interspersing thin slices of strawberries or kiwi between the melon layers.
How do I prevent the whipped topping from becoming watery?
Ensure your cream and mixing bowl are very cold before whipping. Adding a stabilizer like a tablespoon of cornstarch or a bit of cream cheese to the whipping cream can also help it hold its shape and prevent it from weeping, especially in warmer temperatures.
Watermelon Cake
A refreshing and healthy cake made entirely from fresh fruit, perfect for summer gatherings.
Ingredients
-
1 large Watermelon
-
1 small Watermelon
-
Grapes
-
Blueberries
-
Blackberries
-
Raspberries
-
Fresh Mint
-
Wood Skewers
-
Wood Toothpicks
Instructions
-
Step 1
Cut the large watermelon into a thick round ‘cake’ layer, about 2-3 inches high. Discard the rind and seeds. -
Step 2
Drain the ‘cake’ layer on paper towels to remove excess juice. -
Step 3
Cut the small watermelon into bite-sized pieces or decorative shapes for toppings. -
Step 4
Decorate the ‘cake’ layer with fresh berries, grapes, and small watermelon pieces. Secure larger pieces with wood skewers or toothpicks. -
Step 5
Garnish with fresh mint leaves. -
Step 6
Chill the watermelon cake for at least 15 minutes before serving.
Important Information
Nutrition Facts (Per Serving)
It is important to consider this information as approximate and not to use it as definitive health advice.
Allergy Information
Please check ingredients for potential allergens and consult a health professional if in doubt.