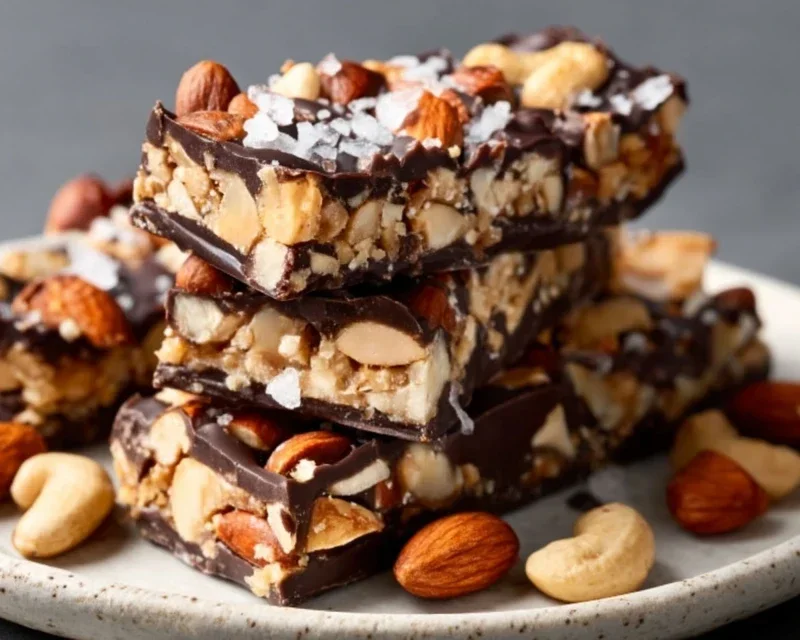
Dark Chocolate Sea Salt Nut Bars-Easy Recipe
Dark Chocolate and Sea Salt Nut Bars. Oh, these bars! If you’re anything like me, the irresistible pull of something that’s simultaneously rich, salty, and satisfying is just too strong to ignore. That’s precisely what makes these Dark Chocolate and Sea Salt Nut Bars such a beloved treat. They’re the perfect balance, a symphony of textures and flavors that will have you reaching for a second (or third!) before you even realize it. We’re talking about the deep, complex notes of premium dark chocolate melting into the satisfying crunch of toasted nuts, all brought to life by those delightful little pops of flaky sea salt. It’s an experience that transcends a simple snack; it’s an indulgence you can feel good about, especially when you know you’ve made them yourself. What makes these bars truly special is that perfect interplay – that moment when the sweet, slightly bitter chocolate meets the bright, briny salt, creating a flavor profile that’s utterly addictive. Get ready to discover your new go-to for a moment of pure bliss.

The Ultimate Dark Chocolate and Sea Salt Nut Bars
There’s something undeniably satisfying about a homemade treat that balances the rich, complex notes of dark chocolate with the subtle crunch of nuts and the surprising sparkle of sea salt. These Dark Chocolate and Sea Salt Nut Bars are exactly that kind of treat. They’re incredibly easy to make, require no baking, and are the perfect combination of chewy, crunchy, and decadent. Whether you need a quick energy boost, a sophisticated dessert, or a thoughtful homemade gift, these bars will hit the spot every time. The beauty of this recipe lies in its simplicity and the ability to customize the nuts to your preference.
Ingredients:
Crafting Your Delicious Bars
The process of creating these bars is straightforward and rewarding, transforming simple ingredients into a delightful confection. We’ll start by preparing our nutty base, then move on to binding it all together and finishing with that irresistible chocolatey goodness.
1. Preparing the Nut and Puffed Rice Base: Begin extract by getting your nuts ready. If you’re using whole nuts, a quick chop will be beneficial for easier eating later, though leaving some larger pieces will add a pleasant textural contrast. I like to roughly chop my almonds and cashews, leaving the peanuts mostly whole for that classic peanut butter cup vibe. In a large bowl, combine your chosen nuts (our mix includes cashews, peanuts, and almonds for a balanced flavor and texture) with the puffed rice. The puffed rice adds a delightful lightness and crunch, preventing the bars from becoming too dense. Give everything a gentle toss to ensure the ingredients are well distributed. This is your foundational layer, so make sure it’s a good mix!
2. Creating the Binding Syrup: Now, let’s bring everything together. In a small saucepan, gently heat the brown rice syrup over low heat. You don’t want to boil it vigorously, just warm it enough to make it pourable and to help it coat the nuts and rice. Stir in the vanilla extract and the 1/2 teaspoon of sea salt. The vanilla adds a wonderful depth of flavor that complements both the nuts and the chocolate, while the sea salt is crucial for cutting through the sweetness and enhancing all the other flavors. Whisk until the salt is dissolved. This warm, fragrant syrup is the magic glue that will hold your bars together.
3. Combining and Pressing the Mixture: Pour the warm syrup mixture over the nuts and puffed rice in the large bowl. Using a sturdy spoon or a spatula, stir thoroughly until every piece of nut and puffed rice is coated in the sticky, sweet syrup. This step requires a bit of effort, but it’s important to ensure an even distribution for a cohesive bar. Once everything is well-coated, transfer this mixture into a prepared 8×8 inch baking pan. I usually line mine with parchment paper, leaving an overhang on the sides to make lifting the bars out a breeze later. Press the mixture down firmly and evenly into the pan. The firmer you press, the more stable your bars will be. You can use the bottom of a glass or a flat-bottomed measuring cup to help compact it. Take your time here; a well-pressed base is key to bars that don’t crum extractble.
4. Melting the Chocolate Topping: While the base is chilling or setting slightly, prepare your decadent chocolate topping. In a heatproof bowl, combine the dark chocolate chips and the coconut oil. The coconut oil is essential here; it helps the chocolate melt smoothly and creates a wonderfully glossy, firm chocolate shell once set. You can melt this mixture using a double boiler or in the microwave. For the microwave method, heat in 30-second intervals, stirring well after each interval, until the chocolate is almost completely melted. Then, stir until smooth and glossy. Be careful not to overheat, as dark chocolate can seize easily. The goal is a silky, pourable chocolate.
5. Finishing Touches and Chilling: Pour the melted dark chocolate evenly over the pressed nut and rice mixture in the pan. Spread it smoothly with an offset spatula or the back of a spoon to cover the entire surface. If you’re using flaky sea salt (and I highly recommend it!), sprinkle it generously over the still-wet chocolate. This adds a beautiful visual appeal and that perfect salty-sweet contrast with every bite. Once the topping is applied, place the pan in the refrigerator for at least 2-3 hours, or until the chocolate is completely set and firm. This chilling time is crucial for the bars to solidify and be easily cut.
Once the bars are thoroughly chilled, use the parchment paper overhang to lift the entire slab out of the pan. Place it on a cutting board and use a sharp knife to cut into your desired bar or square sizes. Store these delightful bars in an airtight container in the refrigerator for the best texture and to keep the chocolate firm. Enjoy!
Conclusion:
And there you have it – your ultimate guide to creating these delectable Dark Chocolate and Sea Salt Nut Bars! I truly believe this recipe is a winner because it strikes that perfect balance between rich, indulgent dark chocolate and the satisfying crunch of nuts, all elevated by the subtle sparkle of sea salt. They’re wonderfully versatile, making them an ideal treat for a mid-afternoon energy boost, a sophisticated dessert after dinner, or even a thoughtful homemade gift. Don’t be afraid to get creative with the nut combinations – almonds, walnuts, pecans, or even a mix can all bring their unique character. For an extra touch, consider adding a sprinkle of chili flakes for a hint of heat or a drizzle of extra melted chocolate. I wholeheartedly encourage you to give these Dark Chocolate and Sea Salt Nut Bars a try. I’m confident you’ll fall in love with their simplicity and the incredible flavor payoff!
Frequently Asked Questions:
Can I make these nut bars vegan?
Absolutely! To make these bars vegan, ensure you use a good quality vegan dark chocolate (most dark chocolate is accidentally vegan, but always check the ingredients for milk solids). You’ll also want to substitute any honey with a liquid sweetener like maple syrup or agave nectar. The nuts and sea salt are naturally vegan, so you’re already halfway there!
How should I store these Dark Chocolate and Sea Salt Nut Bars?
These bars are best stored in an airtight container at room temperature for up to a week. If your kitchen tends to be warm, or you want them to last longer, you can store them in the refrigerator. They’ll firm up even more in the fridge, which some people find enhances the texture. Just be sure to let them sit at room temperature for a few minutes before serving if refrigerated to soften slightly.
What kind of nuts work best in this recipe?
The beauty of these bars is their adaptability! While the recipe often calls for a general mix, I find that a combination of textures and flavors works wonderfully. Roasted almonds offer a great crunch and slightly toasty note, pecans provide a rich, buttery flavor, and walnuts add a pleasant earthiness. Feel free to experiment with your favorites or what you have on hand. Just ensure they are unsalted and roasted for the best flavor.
Dark Chocolate and Sea Salt Nut Bars
Chewy and crunchy nut bars with a rich dark chocolate drizzle and a hint of sea salt. A perfect no-bake treat.
Ingredients
-
2 1/2 cups unsalted nuts of choice (3/4 cup cashews, 3/4 cup peanuts, 1 cup almonds)
-
1/2 cup puffed rice
-
1/4 cup brown rice syrup
-
1 1/2 teaspoon vanilla extract
-
1/2 teaspoon sea salt
-
1 cup dark chocolate chips
-
2 teaspoons coconut oil
-
Optional: flaky salt for topping
Instructions
-
Step 1
Line an 8×8 inch baking pan with parchment paper, leaving some overhang. -
Step 2
In a large bowl, combine the chopped nuts and puffed rice. -
Step 3
In a small saucepan over medium heat, gently warm the brown rice syrup, vanilla extract, and sea salt until combined. Do not boil. -
Step 4
Pour the syrup mixture over the nut and rice mixture. Stir well to coat everything evenly. -
Step 5
Press the mixture firmly into the prepared baking pan. Ensure it’s packed tightly. -
Step 6
In a small microwave-safe bowl, combine the dark chocolate chips and coconut oil. Microwave in 30-second intervals, stirring between each, until melted and smooth. -
Step 7
Drizzle the melted chocolate over the pressed nut mixture. Sprinkle with flaky salt if desired. -
Step 8
Refrigerate for at least 1 hour, or until firm. Cut into bars.
Important Information
Nutrition Facts (Per Serving)
It is important to consider this information as approximate and not to use it as definitive health advice.
Allergy Information
Please check ingredients for potential allergens and consult a health professional if in doubt.