Gluten-Free Sweet Potato Tortillas – Vegan Wraps
Sweet potato tortillas are more than just a gluten-free, vegan wrap; they’re a vibrant burst of flavor and a testament to how delicious healthy eating can be. I’ve always been on the hunt for versatile wraps that satisfy my cravings without compromising my dietary choices, and these sweet potato tortillas have become an absolute revelation in my kitchen. Forget those bland, crum extractbly alternatives – these wraps are wonderfully pliable, slightly sweet, and have a beautiful golden hue that’s as appealing to the eye as it is to the palate. They’re the perfect vehicle for all your favorite fillings, from spicy black beans and avocado to smoky grilled vegetables or even a hearty lentil stew. What truly makes these sweet potato tortillas special is their natural goodness; the inherent sweetness of the potato creates a delightful base that perfectly complements both savory and sweet accompaniments, making them a truly game-changin extractg addition to any meal. Get ready to elevate your wrap game!
Sweet Potato Tortillas (Gluten-Free Vegan Wraps)
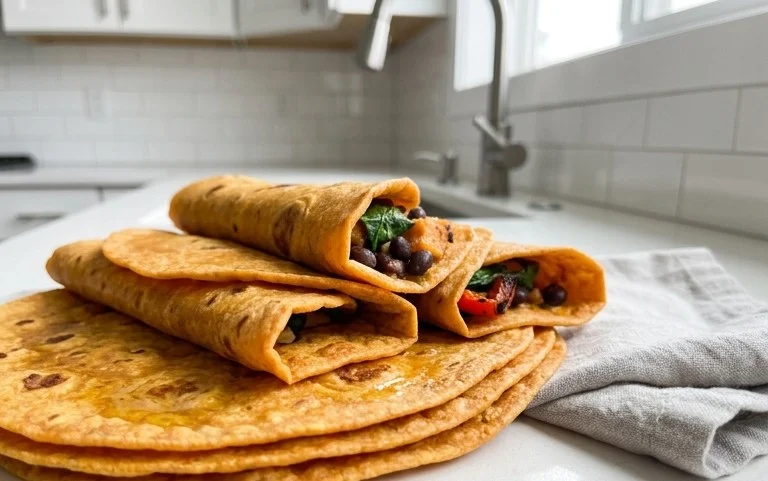
Are you looking for a delicious and healthy alternative to traditional tortillas that are both gluten-free and vegan? Look no further! These Sweet Potato Tortillas are incredibly versatile, wonderfully soft, and packed with a subtle, earthy sweetness from the star ingredient: sweet potatoes. They’re perfect for everything from breakfast burritos to quick lunches and even as a base for your favorite wraps. Plus, they’re surprisingly easy to make, even if you’re new to gluten-free baking. The natural sweetness of the sweet potato eliminates the need for added sugars, making these a guilt-free indulgence.
We’re going to transform simple ingredients into delightful, pliable wraps that hold up beautifully to your favorite fillings. The key to their success lies in getting the texture just right, and I’ll guide you through each step to ensure perfect results every time. Don’t be intimidated by the gluten-free aspect; the psyllium husk and arrowroot flour work together to create a wonderfully flexible dough. Let’s get started on creating these vibrant, wholesome tortillas!
Ingredients:
Preparing the Sweet Potato Base
The first step in creating these wonderful tortillas is to prepare your sweet potatoes. Ensure they are cooked until fork-tender, but critically, do not boil them in water or have any excess liquid remaining. Steaming or baking is ideal for this. Once cooked, you’ll want to mash them thoroughly until they are completely smooth and free of lumps. A potato masher works well, but for an exceptionally smooth puree, you can pass them through a ricer or even give them a quick blitz in a food processor. The smoother the sweet potato puree, the more uniform and pleasant the texture of your final tortillas will be. This smooth base is the foundation for our dough.
Creating the Dough
In a medium bowl, combine the mashed sweet potato with the vegan butter. Gently mix until the butter is fully incorporated and you have a creamy mixture. If you’re using oil instead of vegan butter, simply add it in and stir. Next, add your seasonings: the sea salt, a dash of black pepper, onion powder, and garlic powder. These spices add a subtle savory depth that complements the sweetness of the potato beautifully.
Now, it’s time to introduce the gluten-free sourdough starter. This starter not only adds a lovely tang but also contributes to the structure and chegrape juicess of the tortillas. Stir it into the sweet potato mixture until well combined. The psyllium husk is our binder, and it’s important to let it work its magic. Sprinkle the psyllium husk over the mixture and stir vigorously. You’ll notice the mixture begin extract to thicken quite quickly as the psyllium husk absorbs moisture. If the dough seems too stiff at this point, add 1 tablespoon of hot water and stir again. You might need the second tablespoon of hot water if your sweet potato was particularly dry.
Finally, we’ll add the arrowroot flour. Start with 2 tablespoons and mix it in. Arrowroot flour is a fantastic gluten-free starch that helps create a tender yet pliable dough. If the dough is still quite sticky and unmanageable, add the third tablespoon of arrowroot flour. You are aiming for a dough that is soft and slightly sticky, but one that you can handle without it completely clingin extractg to your hands. If you’re opting for puffier tortillas, this is also the time to gently mix in the baking powder. Be careful not to overmix at this stage, as we want to maintain the tenderness.
Shaping the Tortillas
Once your dough has reached the right consistency, it’s time to shape your tortillas. Dust your work surface with a little extra arrowroot flour or gluten-free all-purpose flour. You’ll want to divide the dough into equal portions. For medium-sized tortillas, I usually aim for about 6 to 8 portions. Roll each portion into a ball.
Now, working with one ball at a time, you have a couple of options for shaping. The easiest method is to use a tortilla press. Place a ball of dough between two pieces of parchment paper inside the press and firmly press down. If you don’t have a tortilla press, you can use a rolling pin. Lightly flour your rolling pin and the dough ball. Gently roll out the dough into a thin, even circle, about 6-8 inches in diameter. Aim for an even thickness; if the edges are cracking too much, it might indicate the dough is a bit dry, and you can add a tiny splash more hot water to the origin extractal dough ball and knead it in briefly. Conversely, if it’s too sticky, add a pinch more arrowroot flour.
Cooking the Tortillas
This is where the magic happens! Heat a lightly oiled skillet or griddle over medium heat. A cast-iron skillet works beautifully for this. Once the pan is hot (a drop of water should sizzle and evaporate quickly), carefully place one of your shaped tortillas onto the hot surface. Cook for about 2-3 minutes per side, or until golden brown spots begin extract to appear and the tortilla is cooked through. You’ll see small bubbles forming on the surface, which is a good sign that it’s cooking nicely.
Don’t overcrowd the pan; cook them one or two at a time so you can manage them easily. As each tortilla finishes cooking, immediately wrap it in a clean kitchen towel or place it in a tortilla warmer. This step is crucial for keeping them soft and pliable. The steam trapped inside the towel will prevent them from drying out and becoming brittle, ensuring they remain wonderfully flexible for all your filling needs. Continue this process with the remaining dough balls until all your delicious sweet potato tortillas are cooked.
Serving and Storing Your Tortillas
Once all your tortillas are cooked, they’re ready to be enjoyed! Let them cool slightly in their towel-lined container before serving. They are incredibly versatile and can be used in so many ways. Fill them with scrambled eggs and avocado for a hearty breakfast wrap, use them as a base for your favorite taco filling, or spread them with hummus and roasted vegetables for a healthy lunch. Their naturally sweet flavor also makes them an interesting base for a dessert wrap, perhaps with some nut butter and fruit.
When it comes to storing any leftovers, ensure they are completely cooled before placing them in an airtight container or a resealable bag. They will keep well in the refrigerator for 3-4 days. To reheat them, you can briefly warm them in a dry skillet over medium heat for about 30 seconds per side, or microwave them for about 15-20 seconds. For longer storage, you can freeze them. Stack them with parchment paper in between each tortilla to prevent sticking, then wrap them tightly in plastic wrap and place them in a freezer-safe bag or container. They can be stored in the freezer for up to 2-3 months. Thaw them at room temperature or gently reheat them from frozen. Enjoy your homemade, healthy, and delicious sweet potato tortillas!
Conclusion:
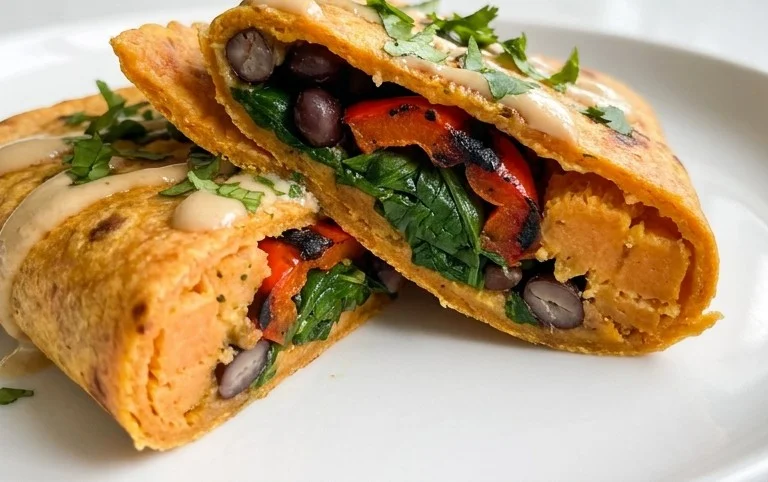
I hope you’re as excited about these Sweet Potato Tortillas as I am! They are a fantastic and versatile gluten-free vegan wrap that brings a delightful sweetness and vibrant color to any meal. The natural sweetness of the sweet potato means you can use these wraps in both savory and sweet applications, making them incredibly adaptable. Whether you’re looking for a healthier alternative to traditional tortillas or have specific dietary needs, these are sure to impress. They’re surprisingly easy to make, and the process itself is quite rewarding. Give them a try – I promise you won’t be disappointed!
These sweet potato tortillas are perfect for a quick lunch wrap filled with your favorite veggies and hummus, or for building delicious vegan tacos. For a sweeter twist, try them with fruit, nut butter, and a drizzle of maple syrup. Don’t be afraid to get creative with your fillings! You can also experiment with adding a pinch of cinnamon or a dash of smoked paprika to the dough for different flavor profiles.
Frequently Asked Questions:
Can I make these tortillas ahead of time?
Absolutely! You can make a batch of these sweet potato tortillas and store them in an airtight container in the refrigerator for up to 3-4 days. For longer storage, you can freeze them between layers of parchment paper in a freezer-safe bag for up to 2 months. Simply thaw them at room temperature or gently reheat them in a dry skillet before serving.
What kind of flour should I use if I don’t have the one listed?
While the specific blend of gluten-free flour listed in the recipe is designed for optimal texture, you can experiment with other gluten-free all-purpose flour blends. Ensure your blend contains a binder like xanthan gum if it’s not already included. You might need to adjust the liquid slightly depending on the absorbency of the flour you choose.
Why are my tortillas tearing when I try to roll them out?
This usually indicates that the dough is too dry or hasn’t been kneaded enough to develop its structure. If the dough feels too crum extractbly, add a tiny bit more water, a teaspoon at a time, until it comes together. If it’s too sticky, add a sprinkle more gluten-free flour. Ensure you’re rolling them out between two pieces of parchment paper to prevent sticking and make handling easier.
Sweet Potato Tortillas (Gluten-Free Vegan Wraps)
Delicious and versatile gluten-free vegan wraps made with sweet potato, perfect for any filling.
Ingredients
-
2 small sweet potatoes – steamed or boiled (no liquid / mashed)
-
2 tbsp vegan butter
-
1-2 tbsp hot water
-
3/4 tsp sea salt
-
dash black pepper
-
1/2 tsp onion powder
-
1/2 tsp garlic powder
-
3/4 cup gluten free sourdough starter
-
2 tsp psyllium husk
-
2-3 tbsp arrowroot flour
-
1/2 tsp baking powder
Instructions
-
Step 1
Mash the steamed or boiled sweet potatoes until smooth, ensuring no liquid remains. -
Step 2
In a bowl, combine the mashed sweet potato, vegan butter, hot water, sea salt, black pepper, onion powder, and garlic powder. Mix well. -
Step 3
Stir in the gluten-free sourdough starter and psyllium husk until thoroughly combined. -
Step 4
Gradually add the arrowroot flour, and baking powder if using, mixing until a soft dough forms. Adjust flour as needed for consistency. -
Step 5
Divide the dough into equal portions and roll each into a ball. Flatten each ball between two pieces of parchment paper to form thin rounds. -
Step 6
Heat a lightly oiled skillet or griddle over medium heat. Cook each tortilla for 2-3 minutes per side, until lightly browned and cooked through.
Important Information
Nutrition Facts (Per Serving)
It is important to consider this information as approximate and not to use it as definitive health advice.
Allergy Information
Please check ingredients for potential allergens and consult a health professional if in doubt.