Best Tri Tip Recipe Two Ways Steak Perfection
Tri tip is a cut of beef that has truly captured the hearts (and stomachs!) of grill masters and home cooks alike. Its incredible versatility and rich, beefy flavor make it a standout choice for any occasion, from a casual backyard barbecue to a more elevated dinner party. But what makes this particular cut so darn special? For starters, the tri tip boasts a fantastic balance of tenderness and marbling, ensuring a juicy and flavorful experience with every bite. We absolutely adore the tri tip for its ability to soak up marinades and rubs, transforming into something truly magical when kissed by flame. Today, we’re diving deep into the wonderful world of tri tip with not one, but two distinct and delicious preparations that will have you reaching for this fantastic cut again and again. Get ready to discover your new favorite way to enjoy tri tip!
Tri Tip (2 Ways)
The tri-tip roast, a flavorful and relatively lean cut from the bottom sirloin, is incredibly versatile and perfect for a home cook. Its beautiful grain and marbling make it a joy to prepare, and the real magic happens when you can enjoy it prepared in two distinct, yet equally delicious, ways. This recipe will guide you through creating a perfectly seasoned tri-tip, and then we’ll explore two fantastic cooking methods: a classic sear and roast for that traditional steakhouse experience, and a smoky, low-and-slow barbecue approach that infuses the meat with incredible depth. Get ready to impress yourself and your guests with this fantastic cut of beef!
Ingredients:
Preparation & Seasoning
The foundation of a great tri-tip, regardless of your chosen cooking method, is proper preparation and seasoning. We’ll start by ensuring our roast is at room temperature. For best results, take your tri-tip out of the refrigerator about 30-60 minutes before you plan to start cooking. This allows for more even cooking from edge to center, preventing the outside from overcooking before the inside reaches your desired temperature.
Next, let’s create our flavor-packed rub. In a small bowl, combine the garlic salt, Lawry’s seasoning salt, kosher salt, black pepper, sugar, garlic powder, and parsley. This blend offers a fantastic balance of savory, salty, and a hint of sweetness that complements the beef beautifully. The sugar, though small in quantity, helps with caramelization during searing, adding another layer of deliciousness.
Once your rub is mixed, pat the tri-tip roast dry with paper towels. This step is crucial for achieving a good sear. Moisture on the surface of the meat will steam it, hindering the development of that coveted brown crust. Evenly coat the entire surface of the tri-tip with the olive oil. This helps the rub adhere to the meat and also contributes to a beautiful sear. Now, generously sprinkle and rub the seasoning mixture all over the roast, making sure every surface is well-coated. Don’t be shy! The tri-tip is a robust cut and can handle a good amount of seasoning.
Method 1: Sear & Roast
This method is ideal for those who love a classic, steakhouse-style preparation. It delivers a beautiful crust and a tender, juicy interior.
1. Preheat Your Oven and Pan: Preheat your oven to 400°F (200°C). Place an oven-safe skillet, like cast iron, over medium-high heat on your stovetop. Add a tablespoon of olive oil to the hot skillet.
2. Sear the Roast: Carefully place the seasoned tri-tip into the hot skillet. Sear for 2-3 minutes per side, until a deep golden-brown crust forms. You’ll want to sear all sides, including the edges, to maximize that flavorful crust. This initial searing locks in the juices and builds incredible flavor.
3. Roast to Perfection: Once seared, transfer the skillet with the tri-tip directly into the preheated oven. Roast for approximately 15-20 minutes for medium-rare, or until an instant-read thermometer inserted into the thickest part of the roast (avoiding bone if present, though tri-tip is typically boneless) registers 130-135°F (54-57°C). For medium, aim for 135-140°F (57-60°C). Remember that the temperature will rise a few degrees as it rests.
4. Rest is Key: This is perhaps the most important step for a tender and juicy roast. Remove the tri-tip from the oven and place it on a cutting board. Tent it loosely with aluminum foil and let it rest for at least 10-15 minutes. This resting period allows the juices to redistribute throughout the meat, ensuring every slice is succulent.
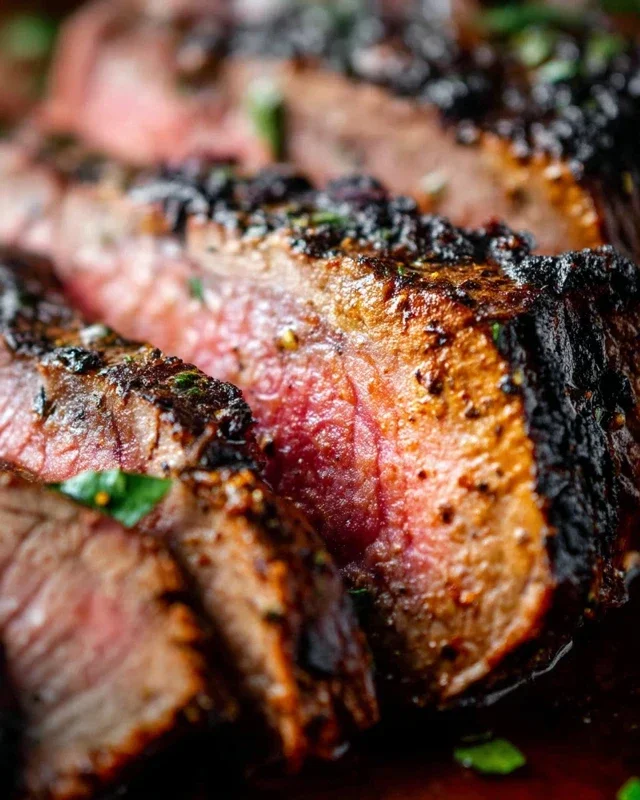
5. Slice Against the Grain: After resting, slice the tri-tip against the grain. You’ll notice the grain runs in different directions in different parts of the roast. Identifying and slicing against this grain is crucial for tender bites. Serve immediately and enjoy the fruits of your labor!
Method 2: Smoked & Grilled
For those who crave that smoky, barbecue flavor, this method is a winner. It takes a bit more time but is well worth the effort for its unique depth of flavor.
1. Prepare Your Smoker/Grill: Preheat your smoker or grill for indirect heat to around 225-250°F (107-121°C). If using a charcoal grill, bank the coals to one side. If using a gas grill, turn on only one or two burners. Add your preferred wood chips or chunks for smoking (hickory, mesquite, or oak are excellent choices).
2. Smoke the Tri-Tip: Place the seasoned tri-tip on the indirect side of your grill or in the smoker. Cook for approximately 1 to 1.5 hours, or until the internal temperature reaches about 115-120°F (46-49°C). This initial smoking phase infuses the meat with delicious smoky notes. You can close the lid during this process.
3. Sear for the Finish: Once the tri-tip has reached the desired internal temperature for smoking, remove it from the smoker/grill and let it rest for about 10 minutes while you prepare for the final sear. Turn your grill up to high heat, or prepare a hot side on your grill for direct searing. Add a little oil to the grill grates if needed.
4. Direct Grill to Finish: Carefully place the tri-tip over the direct heat. Sear for 2-3 minutes per side, just like in Method 1, until a beautiful crust forms and your internal temperature reaches your desired doneness (130-135°F for medium-rare). Watch it closely to prevent overcooking.
5. Rest and Slice: As with the first method, resting is paramount. Remove the tri-tip from the grill, tent it with foil, and let it rest for 10-15 minutes. Slice against the grain for maximum tenderness. This method creates a wonderfully tender roast with a complex smoky flavor profile and a satisfying seared exterior.
Both methods yield a phenomenal tri-tip, offering you the flexibility to choose the perfect preparation based on your craving and available time. Enjoy!

Conclusion:
There you have it! Two fantastic ways to prepare a delicious and surprisingly easy Tri Tip roast. Whether you’re grilling it to smoky perfection or slow-roasting it for ultimate tenderness, this cut of beef is a crowd-pleaser and incredibly versatile. The beauty of tri tip lies in its rich flavor and ability to be enjoyed in so many ways, making it a go-to for weeknight dinners or impressive weekend gatherings. Don’t be intimidated – these recipes are designed for success, allowing you to achieve restaurant-quality results in your own kitchen.
Now that you’ve mastered the basics, get creative with your serving suggestions! Think classic steakhouse style with roasted potatoes and asparagus, or taco night with shredded tri tip and all your favorite fixings. Feel free to experiment with marinades and rubs to put your own spin on this wonderful tri tip. I truly encourage you to give both methods a try. You might just discover your new favorite go-to roast!
Frequently Asked Questions:
Can I prepare tri tip ahead of time?
Yes, absolutely! You can prepare the tri tip up to 24 hours in advance. For the grilled version, you can season and let it marinate in the refrigerator. For the roasted version, you can complete the initial searing and then refrigerate it. Reheat gently before serving to avoid overcooking.
What are some other good marinades for tri tip?
Tri tip is excellent with a variety of marinades! Consider a classic Italian dressing-based marinade, a spicy chili-lime blend, or even a simple soy sauce, garlic, and gin extractger combination. The key is to allow enough time for the flavors to penetrate the meat.
Tri Tip (2 Ways)
A versatile tri tip roast prepared using two distinct flavor profiles for delicious results.
Ingredients
-
2 & 1/2 pound tri tip roast
-
1 & 1/2 teaspoons garlic salt
-
1 tablespoon Lawry’s seasoning salt
-
1 & 1/2 teaspoons kosher salt (Diamond Crystal)
-
1 teaspoon black pepper
-
1/2 teaspoon sugar
-
2 teaspoons garlic powder
-
1 tablespoon dried or fresh parsley
-
1/4 cup olive oil
Instructions
-
Step 1
For the first way (e.g., seasoned grill): Combine Lawry’s seasoning salt, garlic salt, kosher salt, black pepper, sugar, garlic powder, and parsley in a small bowl. Rub the tri tip roast evenly with the seasoning mixture and olive oil. -
Step 2
For the second way (e.g., marinated): In a separate bowl, whisk together olive oil, garlic powder, garlic salt, a pinch of parsley, and a dash of sugar. Marinate the tri tip for at least 30 minutes. -
Step 3
Preheat your grill to medium-high heat, or preheat your oven to 400°F (200°C). -
Step 4
Grill the seasoned tri tip for approximately 10-15 minutes per side, or until an internal temperature of 130-135°F (54-57°C) for medium-rare is reached. For the marinated version, grill or roast as directed for the seasoned version. -
Step 5
If oven-baking the marinated tri tip, place it on a baking sheet and bake for approximately 45-60 minutes, or until the desired internal temperature is reached. -
Step 6
Remove the tri tip from the heat and let it rest for 10-15 minutes before slicing against the grain.
Important Information
Nutrition Facts (Per Serving)
It is important to consider this information as approximate and not to use it as definitive health advice.
Allergy Information
Please check ingredients for potential allergens and consult a health professional if in doubt.